(multi-animal-userguide)=
# DeepLabCut for Multi-Animal Projects
This document should serve as the user guide for maDLC,
and it is here to support the scientific advances presented in [Lauer et al. 2022](https://doi.org/10.1038/s41592-022-01443-0).
Note, we strongly encourage you to use the [Project Manager GUI](project-manager-gui) when you first start using multi-animal mode. Each tab is customized for multi-animal when you create or load a multi-animal project. As long as you follow the recommendations within the GUI, you should be good to go!
## How to think about using maDLC:
You should think of maDLC being **four** parts.
- (1) Curate annotation data that allows you to learn a model to track the objects/animals of interest.
- (2) Create a high-quality pose estimation model.
- (3) Track in space and time, i.e., assemble bodyparts to detected objects/animals and link across time. This step performs assembly and tracking (comprising first local tracking and then tracklet stitching by global reasoning).
- (4) Any and all post-processing you wish to do with the output data, either within DLC or outside of it.
Thus, you should always label, train, and evaluate the pose estimation performance first. If and when that performance is high, then you should go advance to the tracking step (and video analysis). There is a natural break point for this, as you will see below.
 ## Install:
**Quick start:** If you are using DeepLabCut on the cloud, or otherwise cannot use the GUIs and you should install with: `pip install 'deeplabcut[tf]'`; if you need GUI support, please use: `pip install 'deeplabcut[tf,gui]'`. On newer Apple computers (with an M1/M2 chip), use `pip install 'deeplabcut[apple_mchips]'` or `pip install 'deeplabcut[apple_mchips,gui]'` instead.
IF you want to use the bleeding edge version to make edits to the code, see here on how to install it and test it (https://deeplabcut.github.io/DeepLabCut/docs/recipes/installTips.html#how-to-use-the-latest-updates-directly-from-github).
## Get started in the terminal or Project GUI:
**GUI:** simply launch your conda env, and type `python -m deeplabcut` in the terminal.
Then follow the tabs! It might be useful to read the following, however, so you understand what each command does.
**TERMINAL:** To begin, 🚨 (windows) navigate to anaconda prompt and right-click to "open as admin", or (unix/MacOS) simply launch "terminal" on your computer. We assume you have DeepLabCut installed (if not, [see installation instructions](how-to-install)). Next, launch your conda env (i.e., for example `conda activate DEEPLABCUT`).
```{Hint}
🚨 If you use Windows, please always open the terminal with administrator privileges! Right click, and "run as administrator".
```
Please read more [here](https://github.com/DeepLabCut/Docker4DeepLabCut2.0), and in our Nature Protocols paper [here](https://www.nature.com/articles/s41596-019-0176-0). And, see our [troubleshooting wiki](https://github.com/DeepLabCut/DeepLabCut/wiki/Troubleshooting-Tips).
Open an ``ipython`` session and import the package by typing in the terminal:
```python
ipython
import deeplabcut
```
```{TIP:}
for every function there is a associated help document that can be viewed by adding a **?** after the function name; i.e. ``deeplabcut.create_new_project?``. To exit this help screen, type ``:q``.
```
### Create a New Project:
```python
deeplabcut.create_new_project('ProjectName','YourName', ['/usr/FullPath/OfVideo1.avi', '/usr/FullPath/OfVideo2.avi', '/usr/FullPath/OfVideo1.avi'],
copy_videos=True, multianimal=True)
```
Tip: if you want to place the project folder somewhere specific, please also pass : ``working_directory = 'FullPathOftheworkingDirectory'``
- Note, if you are a linux/macos user the path should look like: ``['/home/username/yourFolder/video1.mp4']``; if you are a Windows user, it should look like: ``[r'C:\username\yourFolder\video1.mp4']``
- Note, you can also put ``config_path = `` in front of the above line to create the path to the config.yaml that is used in the next step, i.e. ``config_path=deeplabcut.create_project(...)``)
- If you do not, we recommend setting a variable so this can be easily used! Once you run this step, the config_path is printed for you once you run this line, so set a variable for ease of use, i.e. something like:
```python
config_path = '/thefulloutputpath/config.yaml'
```
- just be mindful of the formatting for Windows vs. Unix, see above.
This set of arguments will create a project directory with the name **Name of the project+name of the experimenter+date of creation of the project** in the **Working directory** and creates the symbolic links to videos in the **videos** directory. The project directory will have subdirectories: **dlc-models**, **labeled-data**, **training-datasets**, and **videos**. All the outputs generated during the course of a project will be stored in one of these subdirectories, thus allowing each project to be curated in separation from other projects. The purpose of the subdirectories is as follows:
**dlc-models:** This directory contains the subdirectories *test* and *train*, each of which holds the meta information with regard to the parameters of the feature detectors in configuration files. The configuration files are YAML files, a common human-readable data serialization language. These files can be opened and edited with standard text editors. The subdirectory *train* will store checkpoints (called snapshots in TensorFlow) during training of the model. These snapshots allow the user to reload the trained model without re-training it, or to pick-up training from a particular saved checkpoint, in case the training was interrupted.
**labeled-data:** This directory will store the frames used to create the training dataset. Frames from different videos are stored in separate subdirectories. Each frame has a filename related to the temporal index within the corresponding video, which allows the user to trace every frame back to its origin.
**training-datasets:** This directory will contain the training dataset used to train the network and metadata, which contains information about how the training dataset was created.
**videos:** Directory of video links or videos. When **copy\_videos** is set to ``False``, this directory contains symbolic links to the videos. If it is set to ``True`` then the videos will be copied to this directory. The default is ``False``. Additionally, if the user wants to add new videos to the project at any stage, the function **add\_new\_videos** can be used. This will update the list of videos in the project's configuration file. Note: you neither need to use this folder for videos, nor is it required for analyzing videos (they can be anywhere).
```python
deeplabcut.add_new_videos('Full path of the project configuration file*', ['full path of video 4', 'full path of video 5'], copy_videos=True/False)
```
*Please note, *Full path of the project configuration file* will be referenced as ``config_path`` throughout this protocol.
You can also use annotated data from singe-animal projects, by converting those files. There are docs for this: [convert single to multianimal annotation data](convert-maDLC)
### Configure the Project:
- open the **config.yaml** file (in a text editor (like atom, gedit, vim etc.)), which can be found in the subfolder created when you set your project name, to change parameters and identify label names! This is a crucial step.
## Install:
**Quick start:** If you are using DeepLabCut on the cloud, or otherwise cannot use the GUIs and you should install with: `pip install 'deeplabcut[tf]'`; if you need GUI support, please use: `pip install 'deeplabcut[tf,gui]'`. On newer Apple computers (with an M1/M2 chip), use `pip install 'deeplabcut[apple_mchips]'` or `pip install 'deeplabcut[apple_mchips,gui]'` instead.
IF you want to use the bleeding edge version to make edits to the code, see here on how to install it and test it (https://deeplabcut.github.io/DeepLabCut/docs/recipes/installTips.html#how-to-use-the-latest-updates-directly-from-github).
## Get started in the terminal or Project GUI:
**GUI:** simply launch your conda env, and type `python -m deeplabcut` in the terminal.
Then follow the tabs! It might be useful to read the following, however, so you understand what each command does.
**TERMINAL:** To begin, 🚨 (windows) navigate to anaconda prompt and right-click to "open as admin", or (unix/MacOS) simply launch "terminal" on your computer. We assume you have DeepLabCut installed (if not, [see installation instructions](how-to-install)). Next, launch your conda env (i.e., for example `conda activate DEEPLABCUT`).
```{Hint}
🚨 If you use Windows, please always open the terminal with administrator privileges! Right click, and "run as administrator".
```
Please read more [here](https://github.com/DeepLabCut/Docker4DeepLabCut2.0), and in our Nature Protocols paper [here](https://www.nature.com/articles/s41596-019-0176-0). And, see our [troubleshooting wiki](https://github.com/DeepLabCut/DeepLabCut/wiki/Troubleshooting-Tips).
Open an ``ipython`` session and import the package by typing in the terminal:
```python
ipython
import deeplabcut
```
```{TIP:}
for every function there is a associated help document that can be viewed by adding a **?** after the function name; i.e. ``deeplabcut.create_new_project?``. To exit this help screen, type ``:q``.
```
### Create a New Project:
```python
deeplabcut.create_new_project('ProjectName','YourName', ['/usr/FullPath/OfVideo1.avi', '/usr/FullPath/OfVideo2.avi', '/usr/FullPath/OfVideo1.avi'],
copy_videos=True, multianimal=True)
```
Tip: if you want to place the project folder somewhere specific, please also pass : ``working_directory = 'FullPathOftheworkingDirectory'``
- Note, if you are a linux/macos user the path should look like: ``['/home/username/yourFolder/video1.mp4']``; if you are a Windows user, it should look like: ``[r'C:\username\yourFolder\video1.mp4']``
- Note, you can also put ``config_path = `` in front of the above line to create the path to the config.yaml that is used in the next step, i.e. ``config_path=deeplabcut.create_project(...)``)
- If you do not, we recommend setting a variable so this can be easily used! Once you run this step, the config_path is printed for you once you run this line, so set a variable for ease of use, i.e. something like:
```python
config_path = '/thefulloutputpath/config.yaml'
```
- just be mindful of the formatting for Windows vs. Unix, see above.
This set of arguments will create a project directory with the name **Name of the project+name of the experimenter+date of creation of the project** in the **Working directory** and creates the symbolic links to videos in the **videos** directory. The project directory will have subdirectories: **dlc-models**, **labeled-data**, **training-datasets**, and **videos**. All the outputs generated during the course of a project will be stored in one of these subdirectories, thus allowing each project to be curated in separation from other projects. The purpose of the subdirectories is as follows:
**dlc-models:** This directory contains the subdirectories *test* and *train*, each of which holds the meta information with regard to the parameters of the feature detectors in configuration files. The configuration files are YAML files, a common human-readable data serialization language. These files can be opened and edited with standard text editors. The subdirectory *train* will store checkpoints (called snapshots in TensorFlow) during training of the model. These snapshots allow the user to reload the trained model without re-training it, or to pick-up training from a particular saved checkpoint, in case the training was interrupted.
**labeled-data:** This directory will store the frames used to create the training dataset. Frames from different videos are stored in separate subdirectories. Each frame has a filename related to the temporal index within the corresponding video, which allows the user to trace every frame back to its origin.
**training-datasets:** This directory will contain the training dataset used to train the network and metadata, which contains information about how the training dataset was created.
**videos:** Directory of video links or videos. When **copy\_videos** is set to ``False``, this directory contains symbolic links to the videos. If it is set to ``True`` then the videos will be copied to this directory. The default is ``False``. Additionally, if the user wants to add new videos to the project at any stage, the function **add\_new\_videos** can be used. This will update the list of videos in the project's configuration file. Note: you neither need to use this folder for videos, nor is it required for analyzing videos (they can be anywhere).
```python
deeplabcut.add_new_videos('Full path of the project configuration file*', ['full path of video 4', 'full path of video 5'], copy_videos=True/False)
```
*Please note, *Full path of the project configuration file* will be referenced as ``config_path`` throughout this protocol.
You can also use annotated data from singe-animal projects, by converting those files. There are docs for this: [convert single to multianimal annotation data](convert-maDLC)
### Configure the Project:
- open the **config.yaml** file (in a text editor (like atom, gedit, vim etc.)), which can be found in the subfolder created when you set your project name, to change parameters and identify label names! This is a crucial step.
 Next, open the **config.yaml** file, which was created during **create\_new\_project**. You can edit this file in any text editor. Familiarize yourself with the meaning of the parameters (Box 1). You can edit various parameters, in particular you **must add the list of *bodyparts* (or points of interest)** that you want to track. You can also set the *colormap* here that is used for all downstream steps (can also be edited at anytime), like labeling GUIs, videos, etc. Here any [matplotlib colormaps](https://matplotlib.org/tutorials/colors/colormaps.html) will do!
An easy way to programmatically edit the config file at any time is to use the function **edit\_config**, which takes the full path of the config file to edit and a dictionary of key–value pairs to overwrite.
````python
edits = {'colormap': 'summer',
'individuals': ['mickey', 'minnie', 'bianca'],
'skeleton': [['snout', 'tailbase'], ['snout', 'rightear']]}
deeplabcut.auxiliaryfunctions.edit_config(config_path, edits)
````
Please DO NOT have spaces in the names of bodyparts, uniquebodyparts, individuals, etc.
**ATTENTIONt:** You need to edit the config.yaml file to **modify the following items** which specify the animal ID, body parts, and any unique labels. Note, we also highly recommend that you use **more bodypoints** that you might be interested in for your experiment, i.e., labeling along the spine/tail for 8 bodypoints would be better than four. This will help the performance.
Modifying the `config.yaml` is crucial:
```python
individuals:
- m1
- m2
- m3
uniquebodyparts:
- topleftcornerofBox
- toprightcornerofBox
multianimalbodyparts:
- snout
- leftear
- rightear
- tailbase
identity: True/False
```
**Individuals:** are names of "individuals" in the annotation dataset. These should/can be generic (e.g. mouse1, mouse2, etc.). These individuals are comprised of the same bodyparts defined by `multianimalbodyparts`. For annotation in the GUI and training, it is important that all individuals in each frame are labeled. Thus, keep in mind that you need to set individuals to the maximum number in your labeled-data set, .i.e., if there is (even just one frame) with 17 animals then the list should be `- indv1` to `- indv17`. Note, once trained if you have a video with more or less animals, that is fine - you can have more or less animals during video analysis!
**Identity:** If you can tell the animals apart, i.e., one might have a collar, or a black marker on the tail of a mouse, then you should label these individuals consistently (i.e., always label the mouse with the black marker as "indv1", etc). If you have this scenario, please set `identity: True` in your `config.yaml` file. If you have 4 black mice, and you truly cannot tell them apart, then leave this as `false`.
**Multianimalbodyparts:** are the bodyparts of each individual (in the above list).
**Uniquebodyparts:** are points that you want to track, but that appear only once within each frame, i.e. they are "unique". Typically these are things like unique objects, landmarks, tools, etc. They can also be animals, e.g. in the case where one German shepherd is attending to many sheep the sheep bodyparts would be multianimalbodyparts, the shepherd parts would be uniquebodyparts and the individuals would be the list of sheep (e.g. Polly, Molly, Dolly, ...).
### Select Frames to Label:
**CRITICAL:** A good training dataset should consist of a sufficient number of frames that capture the breadth of the behavior. This ideally implies to select the frames from different (behavioral) sessions, different lighting and different animals, if those vary substantially (to train an invariant, robust feature detector). Thus for creating a robust network that you can reuse in the laboratory, a good training dataset should reflect the diversity of the behavior with respect to postures, luminance conditions, background conditions, animal identities, etc. of the data that will be analyzed. For the simple lab behaviors comprising mouse reaching, open-field behavior and fly behavior, 100−200 frames gave good results [Mathis et al, 2018](https://www.nature.com/articles/s41593-018-0209-y). However, depending on the required accuracy, the nature of behavior, the video quality (e.g. motion blur, bad lighting) and the context, more or less frames might be necessary to create a good network. Ultimately, in order to scale up the analysis to large collections of videos with perhaps unexpected conditions, one can also refine the data set in an adaptive way (see refinement below). **For maDLC, be sure you have labeled frames with closely interacting animals!**
The function `extract_frames` extracts frames from all the videos in the project configuration file in order to create a training dataset. The extracted frames from all the videos are stored in a separate subdirectory named after the video file’s name under the ‘labeled-data’. This function also has various parameters that might be useful based on the user’s need.
```python
deeplabcut.extract_frames(config_path, mode='automatic/manual', algo='uniform/kmeans', userfeedback=False, crop=True/False)
```
**CRITICAL POINT:** It is advisable to keep the frame size small, as large frames increase the training and
inference time, or you might not have a large enough GPU for this.
When running the function `extract_frames`, if the parameter crop=True, then you will be asked to draw a box within the GUI (and this is written to the config.yaml file).
`userfeedback` allows the user to check which videos they wish to extract frames from. In this way, if you added more videos to the config.yaml file it does not, by default, extract frames (again) from every video. If you wish to disable this question, set `userfeedback = True`.
The provided function either selects frames from the videos in a randomly and temporally uniformly distributed
way (uniform), by clustering based on visual appearance (k-means), or by manual selection. Random
selection of frames works best for behaviors where the postures vary across the whole video. However, some behaviors
might be sparse, as in the case of reaching where the reach and pull are very fast and the mouse is not moving much
between trials (thus, we have the default set to True, as this is best for most use-cases we encounter). In such a case, the function that allows selecting frames based on k-means derived quantization would
be useful. If the user chooses to use k-means as a method to cluster the frames, then this function downsamples the
video and clusters the frames using k-means, where each frame is treated as a vector. Frames from different clusters
are then selected. This procedure makes sure that the frames look different. However, on large and long videos, this
code is slow due to computational complexity.
**CRITICAL POINT:** It is advisable to extract frames from a period of the video that contains interesting
behaviors, and not extract the frames across the whole video. This can be achieved by using the start and stop
parameters in the config.yaml file. Also, the user can change the number of frames to extract from each video using
the numframes2extract in the config.yaml file.
**For maDLC, be sure you have labeled frames with closely interacting animals!** Therefore, manually selecting some frames is a good idea if interactions are not highly frequent in the video.
However, picking frames is highly dependent on the data and the behavior being studied. Therefore, it is hard to
provide all purpose code that extracts frames to create a good training dataset for every behavior and animal. If the user feels specific frames are lacking, they can extract hand selected frames of interest using the interactive GUI
provided along with the toolbox. This can be launched by using:
```python
deeplabcut.extract_frames(config_path, 'manual')
```
The user can use the *Load Video* button to load one of the videos in the project configuration file, use the scroll
bar to navigate across the video and *Grab a Frame* (or a range of frames, as of version 2.0.5) to extract the frame(s). The user can also look at the extracted frames and e.g. delete frames (from the directory) that are too similar before reloading the set and then manually annotating them.
### Label Frames:
```python
deeplabcut.label_frames(config_path)
```
As of 2.2 there is a new multi-animal labeling GUI (as long as in your `config.yaml` says `multianimalproject: true` at the top, this will automatically launch).
The toolbox provides a function **label_frames** which helps the user to easily label all the extracted frames using
an interactive graphical user interface (GUI). The user should have already named the body parts to label (points of
interest) in the project’s configuration file by providing a list. The following command invokes the labeling toolbox.
The user needs to use the *Load Frames* button to select the directory which stores the extracted frames from one of
the videos. Subsequently, the user can use one of the radio buttons (top right) to select a body part to label. **RIGHT** click to add the label. Left click to drag the label, if needed. If you label a part accidentally, you can use the middle button on your mouse to delete (or hit the delete key while you hover over the point)! If you cannot see a body part in the frame, skip over the label! Please see the ``HELP`` button for more user instructions. This auto-advances once you labeled the first body part. You can also advance to the next frame by clicking on the RIGHT arrow on your keyboard (and go to a previous frame with LEFT arrow).
Each label will be plotted as a dot in a unique color.
The user is free to move around the body part and once satisfied with its position, can select another radio button
(in the top right) to switch to the respective body part (it otherwise auto-advances). The user can skip a body part if it is not visible. Once all the visible body parts are labeled, then the user can use ‘Next Frame’ to load the following frame. The user needs to save the labels after all the frames from one of the videos are labeled by clicking the save button at the bottom right. Saving the labels will create a labeled dataset for each video in a hierarchical data file format (HDF) in the
subdirectory corresponding to the particular video in **labeled-data**. You can save at any intermediate step (even without closing the GUI, just hit save) and you return to labeling a dataset by reloading it!
**CRITICAL POINT:** It is advisable to **consistently label similar spots** (e.g., on a wrist that is very large, try
to label the same location). In general, invisible or occluded points should not be labeled by the user, unless you want to teach the network to "guess" - this is possible, but could affect accuracy. If you don't want/or don't see a bodypart, they can simply be skipped by not applying the label anywhere on the frame.
OPTIONAL: In the event of adding more labels to the existing labeled dataset, the user need to append the new
labels to the bodyparts in the config.yaml file. Thereafter, the user can call the function **label_frames**. A box will pop up and ask the user if they wish to display all parts, or only add in the new labels. Saving the labels after all the images are labelled will append the new labels to the existing labeled dataset.
**maDeepLabCut CRITICAL POINT:** For multi-animal labeling, unless you can tell apart the animals, you do not need to worry about the "ID" of each animal. For example: if you have a white and black mouse label the white mouse as animal 1, and black as animal 2 across all frames. If two black mice, then the ID label 1 or 2 can switch between frames - no need for you to try to identify them (but always label consistently within a frame). If you have 2 black mice but one always has an optical fiber (for example), then DO label them consistently as animal1 and animal_fiber (for example). The point of multi-animal DLC is to train models that can first group the correct bodyparts to individuals, then associate those points in a given video to a specific individual, which then also uses temporal information to link across the video frames.
Note, we also highly recommend that you use more bodypoints that you might otherwise have (see the example below).
**Example Labeling with maDeepLabCut:**
- note you should within an animal be consistent, i.e., all bodyparts on mouse1 should be on mouse1, but across frames "mouse1" can be any of the black mice (as here it is nearly impossible to tell them apart visually). IF you can tell them apart, do label consistently!
Next, open the **config.yaml** file, which was created during **create\_new\_project**. You can edit this file in any text editor. Familiarize yourself with the meaning of the parameters (Box 1). You can edit various parameters, in particular you **must add the list of *bodyparts* (or points of interest)** that you want to track. You can also set the *colormap* here that is used for all downstream steps (can also be edited at anytime), like labeling GUIs, videos, etc. Here any [matplotlib colormaps](https://matplotlib.org/tutorials/colors/colormaps.html) will do!
An easy way to programmatically edit the config file at any time is to use the function **edit\_config**, which takes the full path of the config file to edit and a dictionary of key–value pairs to overwrite.
````python
edits = {'colormap': 'summer',
'individuals': ['mickey', 'minnie', 'bianca'],
'skeleton': [['snout', 'tailbase'], ['snout', 'rightear']]}
deeplabcut.auxiliaryfunctions.edit_config(config_path, edits)
````
Please DO NOT have spaces in the names of bodyparts, uniquebodyparts, individuals, etc.
**ATTENTIONt:** You need to edit the config.yaml file to **modify the following items** which specify the animal ID, body parts, and any unique labels. Note, we also highly recommend that you use **more bodypoints** that you might be interested in for your experiment, i.e., labeling along the spine/tail for 8 bodypoints would be better than four. This will help the performance.
Modifying the `config.yaml` is crucial:
```python
individuals:
- m1
- m2
- m3
uniquebodyparts:
- topleftcornerofBox
- toprightcornerofBox
multianimalbodyparts:
- snout
- leftear
- rightear
- tailbase
identity: True/False
```
**Individuals:** are names of "individuals" in the annotation dataset. These should/can be generic (e.g. mouse1, mouse2, etc.). These individuals are comprised of the same bodyparts defined by `multianimalbodyparts`. For annotation in the GUI and training, it is important that all individuals in each frame are labeled. Thus, keep in mind that you need to set individuals to the maximum number in your labeled-data set, .i.e., if there is (even just one frame) with 17 animals then the list should be `- indv1` to `- indv17`. Note, once trained if you have a video with more or less animals, that is fine - you can have more or less animals during video analysis!
**Identity:** If you can tell the animals apart, i.e., one might have a collar, or a black marker on the tail of a mouse, then you should label these individuals consistently (i.e., always label the mouse with the black marker as "indv1", etc). If you have this scenario, please set `identity: True` in your `config.yaml` file. If you have 4 black mice, and you truly cannot tell them apart, then leave this as `false`.
**Multianimalbodyparts:** are the bodyparts of each individual (in the above list).
**Uniquebodyparts:** are points that you want to track, but that appear only once within each frame, i.e. they are "unique". Typically these are things like unique objects, landmarks, tools, etc. They can also be animals, e.g. in the case where one German shepherd is attending to many sheep the sheep bodyparts would be multianimalbodyparts, the shepherd parts would be uniquebodyparts and the individuals would be the list of sheep (e.g. Polly, Molly, Dolly, ...).
### Select Frames to Label:
**CRITICAL:** A good training dataset should consist of a sufficient number of frames that capture the breadth of the behavior. This ideally implies to select the frames from different (behavioral) sessions, different lighting and different animals, if those vary substantially (to train an invariant, robust feature detector). Thus for creating a robust network that you can reuse in the laboratory, a good training dataset should reflect the diversity of the behavior with respect to postures, luminance conditions, background conditions, animal identities, etc. of the data that will be analyzed. For the simple lab behaviors comprising mouse reaching, open-field behavior and fly behavior, 100−200 frames gave good results [Mathis et al, 2018](https://www.nature.com/articles/s41593-018-0209-y). However, depending on the required accuracy, the nature of behavior, the video quality (e.g. motion blur, bad lighting) and the context, more or less frames might be necessary to create a good network. Ultimately, in order to scale up the analysis to large collections of videos with perhaps unexpected conditions, one can also refine the data set in an adaptive way (see refinement below). **For maDLC, be sure you have labeled frames with closely interacting animals!**
The function `extract_frames` extracts frames from all the videos in the project configuration file in order to create a training dataset. The extracted frames from all the videos are stored in a separate subdirectory named after the video file’s name under the ‘labeled-data’. This function also has various parameters that might be useful based on the user’s need.
```python
deeplabcut.extract_frames(config_path, mode='automatic/manual', algo='uniform/kmeans', userfeedback=False, crop=True/False)
```
**CRITICAL POINT:** It is advisable to keep the frame size small, as large frames increase the training and
inference time, or you might not have a large enough GPU for this.
When running the function `extract_frames`, if the parameter crop=True, then you will be asked to draw a box within the GUI (and this is written to the config.yaml file).
`userfeedback` allows the user to check which videos they wish to extract frames from. In this way, if you added more videos to the config.yaml file it does not, by default, extract frames (again) from every video. If you wish to disable this question, set `userfeedback = True`.
The provided function either selects frames from the videos in a randomly and temporally uniformly distributed
way (uniform), by clustering based on visual appearance (k-means), or by manual selection. Random
selection of frames works best for behaviors where the postures vary across the whole video. However, some behaviors
might be sparse, as in the case of reaching where the reach and pull are very fast and the mouse is not moving much
between trials (thus, we have the default set to True, as this is best for most use-cases we encounter). In such a case, the function that allows selecting frames based on k-means derived quantization would
be useful. If the user chooses to use k-means as a method to cluster the frames, then this function downsamples the
video and clusters the frames using k-means, where each frame is treated as a vector. Frames from different clusters
are then selected. This procedure makes sure that the frames look different. However, on large and long videos, this
code is slow due to computational complexity.
**CRITICAL POINT:** It is advisable to extract frames from a period of the video that contains interesting
behaviors, and not extract the frames across the whole video. This can be achieved by using the start and stop
parameters in the config.yaml file. Also, the user can change the number of frames to extract from each video using
the numframes2extract in the config.yaml file.
**For maDLC, be sure you have labeled frames with closely interacting animals!** Therefore, manually selecting some frames is a good idea if interactions are not highly frequent in the video.
However, picking frames is highly dependent on the data and the behavior being studied. Therefore, it is hard to
provide all purpose code that extracts frames to create a good training dataset for every behavior and animal. If the user feels specific frames are lacking, they can extract hand selected frames of interest using the interactive GUI
provided along with the toolbox. This can be launched by using:
```python
deeplabcut.extract_frames(config_path, 'manual')
```
The user can use the *Load Video* button to load one of the videos in the project configuration file, use the scroll
bar to navigate across the video and *Grab a Frame* (or a range of frames, as of version 2.0.5) to extract the frame(s). The user can also look at the extracted frames and e.g. delete frames (from the directory) that are too similar before reloading the set and then manually annotating them.
### Label Frames:
```python
deeplabcut.label_frames(config_path)
```
As of 2.2 there is a new multi-animal labeling GUI (as long as in your `config.yaml` says `multianimalproject: true` at the top, this will automatically launch).
The toolbox provides a function **label_frames** which helps the user to easily label all the extracted frames using
an interactive graphical user interface (GUI). The user should have already named the body parts to label (points of
interest) in the project’s configuration file by providing a list. The following command invokes the labeling toolbox.
The user needs to use the *Load Frames* button to select the directory which stores the extracted frames from one of
the videos. Subsequently, the user can use one of the radio buttons (top right) to select a body part to label. **RIGHT** click to add the label. Left click to drag the label, if needed. If you label a part accidentally, you can use the middle button on your mouse to delete (or hit the delete key while you hover over the point)! If you cannot see a body part in the frame, skip over the label! Please see the ``HELP`` button for more user instructions. This auto-advances once you labeled the first body part. You can also advance to the next frame by clicking on the RIGHT arrow on your keyboard (and go to a previous frame with LEFT arrow).
Each label will be plotted as a dot in a unique color.
The user is free to move around the body part and once satisfied with its position, can select another radio button
(in the top right) to switch to the respective body part (it otherwise auto-advances). The user can skip a body part if it is not visible. Once all the visible body parts are labeled, then the user can use ‘Next Frame’ to load the following frame. The user needs to save the labels after all the frames from one of the videos are labeled by clicking the save button at the bottom right. Saving the labels will create a labeled dataset for each video in a hierarchical data file format (HDF) in the
subdirectory corresponding to the particular video in **labeled-data**. You can save at any intermediate step (even without closing the GUI, just hit save) and you return to labeling a dataset by reloading it!
**CRITICAL POINT:** It is advisable to **consistently label similar spots** (e.g., on a wrist that is very large, try
to label the same location). In general, invisible or occluded points should not be labeled by the user, unless you want to teach the network to "guess" - this is possible, but could affect accuracy. If you don't want/or don't see a bodypart, they can simply be skipped by not applying the label anywhere on the frame.
OPTIONAL: In the event of adding more labels to the existing labeled dataset, the user need to append the new
labels to the bodyparts in the config.yaml file. Thereafter, the user can call the function **label_frames**. A box will pop up and ask the user if they wish to display all parts, or only add in the new labels. Saving the labels after all the images are labelled will append the new labels to the existing labeled dataset.
**maDeepLabCut CRITICAL POINT:** For multi-animal labeling, unless you can tell apart the animals, you do not need to worry about the "ID" of each animal. For example: if you have a white and black mouse label the white mouse as animal 1, and black as animal 2 across all frames. If two black mice, then the ID label 1 or 2 can switch between frames - no need for you to try to identify them (but always label consistently within a frame). If you have 2 black mice but one always has an optical fiber (for example), then DO label them consistently as animal1 and animal_fiber (for example). The point of multi-animal DLC is to train models that can first group the correct bodyparts to individuals, then associate those points in a given video to a specific individual, which then also uses temporal information to link across the video frames.
Note, we also highly recommend that you use more bodypoints that you might otherwise have (see the example below).
**Example Labeling with maDeepLabCut:**
- note you should within an animal be consistent, i.e., all bodyparts on mouse1 should be on mouse1, but across frames "mouse1" can be any of the black mice (as here it is nearly impossible to tell them apart visually). IF you can tell them apart, do label consistently!
### Check Annotated Frames:
Checking if the labels were created and stored correctly is beneficial for training, since labeling
is one of the most critical parts for creating the training dataset. The DeepLabCut toolbox provides a function
‘check_labels’ to do so. It is used as follows:
```python
deeplabcut.check_labels(config_path, visualizeindividuals=True/False)
```
**maDeepLabCut:** you can check and plot colors per individual or per body part, just set the flag `visualizeindividuals=True/False`. Note, you can run this twice in both states to see both images.

For each video directory in labeled-data this function creates a subdirectory with **labeled** as a suffix. Those directories contain the frames plotted with the annotated body parts. The user can double check if the body parts are labeled correctly. If they are not correct, the user can reload the frames (i.e. `deeplabcut.label_frames`), move them around, and click save again.
### Create Training Dataset:
At this point you also select your neural network type. Please see Lauer et al. 2021 for options. For **create_multianimaltraining_dataset** we already changed this such that by default you will use imgaug, ADAM optimization, our new DLCRNet, and batch training. We suggest these defaults at this time. Then run:
```python
deeplabcut.create_multianimaltraining_dataset(config_path)
```
- The set of arguments in the function will shuffle the combined labeled dataset and split it to create train and test
sets. The subdirectory with suffix ``iteration#`` under the directory **training-datasets** stores the dataset and meta
information, where the ``#`` is the value of ``iteration`` variable stored in the project’s configuration file (this number
keeps track of how often the dataset was refined).
- OPTIONAL: If the user wishes to benchmark the performance of the DeepLabCut, they can create multiple
training datasets by specifying an integer value to the `num_shuffles`; see the docstring for more details.
- Each iteration of the creation of a training dataset will create several files, which is used by the feature detectors,
and a ``.pickle`` file that contains the meta information about the training dataset. This also creates two subdirectories
within **dlc-models** called ``test`` and ``train``, and these each have a configuration file called pose_cfg.yaml.
Specifically, the user can edit the **pose_cfg.yaml** within the **train** subdirectory before starting the training. These
configuration files contain meta information with regard to the parameters of the feature detectors. Key parameters
are listed in Box 2.
- At this step, the ImageNet pre-trained networks (i.e. ResNet-50) weights will be downloaded. If they do not download (you will see this downloading in the terminal, then you may not have permission to do so (something we have seen with some Windows users - see the **[WIKI troubleshooting for more help!](https://github.com/DeepLabCut/DeepLabCut/wiki/Troubleshooting-Tips)**).
**OPTIONAL POINTS:**
With the data-driven skeleton selection introduced in 2.2rc1+, DLC networks are trained by default
on complete skeletons (i.e., they learn all possible redundant connections), before being optimally pruned
at model evaluation. Although this procedure is by far superior to manually defining a graph,
we leave manually-defining a skeleton as an option for the advanced user:
```python
my_better_graph = [[0, 1], [1, 2], [2, 3]] # These are indices in the list of multianimalbodyparts
deeplabcut.create_multianimaltraining_dataset(config_path, paf_graph=my_better_graph)
```
Alternatively, the `skeleton` defined in the `config.yaml` file can also be used:
```python
deeplabcut.create_multianimaltraining_dataset(config_path, paf_graph='config')
```
Importantly, if a user-defined graph is used it still is required to cover all multianimalbodyparts at least once.
**DATA AUGMENTATION:** At this stage you can also decide what type of augmentation to use. The default loaders work well for most all tasks (as shown on www.deeplabcut.org), but there are many options, more data augmentation, intermediate supervision, etc. Please look at the [**pose_cfg.yaml**](https://github.com/DeepLabCut/DeepLabCut/blob/master/deeplabcut/pose_cfg.yaml) file for a full list of parameters **you might want to change before running this step.** There are several data loaders that can be used. For example, you can use the default loader (introduced and described in the Nature Protocols paper), [TensorPack](https://github.com/tensorpack/tensorpack) for data augmentation (currently this is easiest on Linux only), or [imgaug](https://imgaug.readthedocs.io/en/latest/). We recommend `imgaug` (which is default now!). You can set this by passing:``` deeplabcut.create_training_dataset(config_path, augmenter_type='imgaug') ```
The differences of the loaders are as follows:
- `default`: our standard DLC 2.0 introduced in Nature Protocols variant (scaling, auto-crop augmentation) *will be renamed to `crop_scale` in a future release!*
- `imgaug`: a lot of augmentation possibilities, efficient code for target map creation & batch sizes >1 supported. You can set the parameters such as the `batch_size` in the `pose_cfg.yaml` file for the model you are training.
- `tensorpack`: a lot of augmentation possibilities, multi CPU support for fast processing, target maps are created less efficiently than in imgaug, does not allow batch size>1
- `deterministic`: only useful for testing, freezes numpy seed; otherwise like default.
Our recent [A Primer on Motion Capture with Deep Learning: Principles, Pitfalls, and Perspectives](https://www.cell.com/neuron/pdf/S0896-6273(20)30717-0.pdf), details the advantage of augmentation for a worked example (see Fig 7). TL;DR: use imgaug and use the symmetries of your data!
Alternatively, you can set the loader (as well as other training parameters) in the **pose_cfg.yaml** file of the model that you want to train. Note, to get details on the options, look at the default file: [**pose_cfg.yaml**](https://github.com/DeepLabCut/DeepLabCut/blob/master/deeplabcut/pose_cfg.yaml).
Importantly, image cropping as previously done with `deeplabcut.cropimagesandlabels` in multi-animal projects
is now part of the augmentation pipeline. In other words, image crops are no longer stored in labeled-data/..._cropped
folders. Crop size still defaults to (400, 400); if your images are very large (e.g. 2k, 4k pixels), consider increasing the crop size, but be aware unless you have a strong GPU (24 GB memory or more), you will hit memory errors. You can lower the batch size, but this may affect performance.
In addition, one can specify a crop sampling strategy: crop centers can either be taken at random over the image (`uniform`) or the annotated keypoints (`keypoints`); with a focus on regions of the scene with high body part density (`density`); last, combining `uniform` and `density` for a `hybrid` balanced strategy (this is the default strategy). Note that both parameters can be easily edited prior to training in the **pose_cfg.yaml** configuration file.
As a reminder, cropping images into smaller patches is a form of data augmentation that simultaneously
allows the use of batch processing even on small GPUs that could not otherwise accommodate larger images + larger batchsizes (this usually increases performance and decreasing training time).
### Train The Network:
```python
deeplabcut.train_network(config_path, allow_growth=True)
```
The set of arguments in the function starts training the network for the dataset created for one specific shuffle. Note that you can change the loader (imgaug/default/etc) as well as other training parameters in the **pose_cfg.yaml** file of the model that you want to train (before you start training).
Example parameters that one can call:
```python
deeplabcut.train_network(config_path, shuffle=1, trainingsetindex=0, gputouse=None, max_snapshots_to_keep=5, autotune=False, displayiters=100, saveiters=15000, maxiters=30000, allow_growth=True)
```
By default, the pretrained networks are not in the DeepLabCut toolbox (as they are around 100MB each), but they get downloaded before you train. However, if not previously downloaded from the TensorFlow model weights, it will be downloaded and stored in a subdirectory *pre-trained* under the subdirectory *models* in *Pose_Estimation_Tensorflow*.
At user specified iterations during training checkpoints are stored in the subdirectory *train* under the respective iteration directory.
If the user wishes to restart the training at a specific checkpoint they can specify the full path of the checkpoint to
the variable ``init_weights`` in the **pose_cfg.yaml** file under the *train* subdirectory (see Box 2).
**CRITICAL POINT:** It is recommended to train the networks for thousands of iterations until the loss plateaus (typically around **500,000**) if you use batch size 1, and **50-100K** if you use batchsize 8 (the default).
If you use **maDeepLabCut** the recommended training iterations is **20K-100K** (it automatically stops at 200K!), as we use Adam and batchsize 8; if you have to reduce the batchsize for memory reasons then the number of iterations needs to be increased.
The variables ``display_iters`` and ``save_iters`` in the **pose_cfg.yaml** file allows the user to alter how often the loss is displayed and how often the weights are stored.
**maDeepLabCut CRITICAL POINT:** For multi-animal projects we are using not only different and new output layers, but also new data augmentation, optimization, learning rates, and batch training defaults. Thus, please use a lower ``save_iters`` and ``maxiters``. I.e. we suggest saving every 10K-15K iterations, and only training until 50K-100K iterations. We recommend you look closely at the loss to not overfit on your data. The bonus, training time is much less!!!
**Parameters:**
```
config : string
Full path of the config.yaml file as a string.
shuffle: int, optional
Integer value specifying the shuffle index to select for training. Default is set to 1
trainingsetindex: int, optional
Integer specifying which TrainingsetFraction to use. By default the first (note that TrainingFraction is a list in config.yaml).
gputouse: int, optional. Natural number indicating the number of your GPU (see number in nvidia-smi). If you do not have a GPU, put None.
See: https://nvidia.custhelp.com/app/answers/detail/a_id/3751/~/useful-nvidia-smi-queries
max_snapshots_to_keep: int, or None. Sets how many snapshots are kept, i.e. states of the trained network. For every saving iteration a snapshot is stored, however, only the last max_snapshots_to_keep many are kept! If you change this to None, then all are kept.
See: https://github.com/DeepLabCut/DeepLabCut/issues/8#issuecomment-387404835
autotune: property of TensorFlow, somehow faster if 'false' (as Eldar found out, see https://github.com/tensorflow/tensorflow/issues/13317). Default: False
displayiters: this variable is actually set in pose_config.yaml. However, you can overwrite it with this hack. Don't use this regularly, just if you are too lazy to dig out
the pose_config.yaml file for the corresponding project. If None, the value from there is used, otherwise it is overwritten! Default: None
saveiters: this variable is actually set in pose_config.yaml. However, you can overwrite it with this hack. Don't use this regularly, just if you are too lazy to dig out
the pose_config.yaml file for the corresponding project. If None, the value from there is used, otherwise it is overwritten! Default: None
maxiters: This sets how many iterations to train. This variable is set in pose_config.yaml. However, you can overwrite it with this. If None, the value from there is used, otherwise it is overwritten! Default: None
```
### Evaluate the Trained Network:
Here, for traditional projects you will get a pixel distance metric and you should inspect the individual frames:
```python
deeplabcut.evaluate_network(config_path, plotting=True)
```
:movie_camera:[VIDEO TUTORIAL AVAILABLE!](https://www.youtube.com/watch?v=bgfnz1wtlpo)
It is important to evaluate the performance of the trained network. This performance is measured by computing
the mean average Euclidean error (MAE; which is proportional to the average root mean square error) between the
manual labels and the ones predicted by DeepLabCut. The MAE is saved as a comma separated file and displayed
for all pairs and only likely pairs (>p-cutoff). This helps to exclude, for example, occluded body parts. One of the
strengths of DeepLabCut is that due to the probabilistic output of the scoremap, it can, if sufficiently trained, also
reliably report if a body part is visible in a given frame. (see discussions of finger tips in reaching and the Drosophila
legs during 3D behavior in [Mathis et al, 2018]). The evaluation results are computed by typing:
Setting ``plotting`` to True plots all the testing and training frames with the manual and predicted labels; these will
be colored by body part type by default. They can alternatively be colored by individual by passing `plotting`=`individual`.
The user should visually check the labeled test (and training) images that are created in the ‘evaluation-results’ directory.
Ideally, DeepLabCut labeled unseen (test images) according to the user’s required accuracy, and the average train
and test errors are comparable (good generalization). What (numerically) comprises an acceptable MAE depends on
many factors (including the size of the tracked body parts, the labeling variability, etc.). Note that the test error can
also be larger than the training error due to human variability (in labeling, see Figure 2 in Mathis et al, Nature Neuroscience 2018).
**Optional parameters:**
```
Shuffles: list, optional -List of integers specifying the shuffle indices of the training dataset. The default is [1]
plotting: bool, optional -Plots the predictions on the train and test images. The default is `False`; if provided it must be either `True` or `False`
show_errors: bool, optional -Display train and test errors. The default is `True`
comparisonbodyparts: list of bodyparts, Default is all -The average error will be computed for those body parts only (Has to be a subset of the body parts).
gputouse: int, optional -Natural number indicating the number of your GPU (see number in nvidia-smi). If you do not have a GPU, put None. See: https://nvidia.custhelp.com/app/answers/detail/a_id/3751/~/useful-nvidia-smi-queries
```
The plots can be customized by editing the **config.yaml** file (i.e., the colormap, scale, marker size (dotsize), and
transparency of labels (alphavalue) can be modified). By default each body part is plotted in a different color
(governed by the colormap) and the plot labels indicate their source. Note that by default the human labels are
plotted as plus (‘+’), DeepLabCut’s predictions either as ‘.’ (for confident predictions with likelihood > p-cutoff) and
’x’ for (likelihood <= `pcutoff`).
The evaluation results for each shuffle of the training dataset are stored in a unique subdirectory in a newly created
directory ‘evaluation-results’ in the project directory. The user can visually inspect if the distance between the labeled
and the predicted body parts are acceptable. In the event of benchmarking with different shuffles of same training
dataset, the user can provide multiple shuffle indices to evaluate the corresponding network. If the generalization is
not sufficient, the user might want to:
• check if the labels were imported correctly; i.e., invisible points are not labeled and the points of interest are
labeled accurately
• make sure that the loss has already converged
• consider labeling additional images and make another iteration of the training data set
**maDeepLabCut: (or on normal projects!)**
In multi-animal projects, model evaluation is crucial as this is when
the data-driven selection of the optimal skeleton is carried out. Skipping that step
causes video analysis to use the redundant skeleton by default, which is not only slow
but does not guarantee best performance.
You should also plot the scoremaps, locref layers, and PAFs to assess performance:
```python
deeplabcut.extract_save_all_maps(config_path, shuffle=shuffle, Indices=[0, 5])
```
you can drop "Indices" to run this on all training/testing images (this is very slow!)
### Evaluating your network on videos
**-------------------- DECISION POINT -------------------**
**ATTENTION!**
**Pose estimation and tracking should be thought of as separate steps.** If you do not have good pose estimation evaluation metrics at this point, stop, check original labels, add more data, etc --> don't move forward with this model. If you think you have a good model, please test the "raw" pose estimation performance on a video to validate performance:
Please run:
```python
scorername = deeplabcut.analyze_videos(config_path,['/fullpath/project/videos/testVideo.mp4'], videotype='.mp4')
deeplabcut.create_video_with_all_detections(config_path, ['/fullpath/project/videos/testVideo.mp4'], videotype='.mp4')
```
Please note that you do **not** get the .h5/csv file you might be used to getting (this comes after tracking). You will get a `pickle` file that is used in `create_video_with_all_detections`.
Another sanity check may be to examine the distributions of edge affinity costs using `deeplabcut.utils.plot_edge_affinity_distributions`. Easily separable distributions indicate that the model has learned strong links to group keypoints into distinct individuals — likely a necessary feature for the assembly stage (note that the amount of overlap will also depend on the amount of interactions between your animals in the daset).
IF you have good clean out video, ending in `....full.mp4` (and the evaluation metrics look good, scoremaps look good, plotted evaluation images, and affinity distributions are far apart for most edges), then go forward!!!
If this does not look good, we recommend extracting and labeling more frames (even from more videos). Try to label close interactions of animals for best performance. Once you label more, you can create a new training set and train.
You can either:
1. extract more frames manually from existing or new videos and label as when initially building the training data set, or
2. let DeepLabCut find frames where keypoints were poorly detected and automatically extract those for you. All you need is
to run:
```python
deeplabcut.find_outliers_in_raw_data(config_path, pickle_file, video_file)
```
where pickle_file is the `_full.pickle` one obtains after video analysis.
Flagged frames will be added to your collection of images in the corresponding labeled-data folders for you to label.
## Animal Assembly and Tracking across frames
After pose estimation, now you perform assembly and tracking. *NEW* in 2.2 is a novel data-driven way to set the optimal skeleton and assembly metrics, so this no longer requires user input. The metrics, in case you do want to edit them, can be found in the `inference_cfg.yaml` file.
### Optimized Animal Assembly + Video Analysis:
- Please note that **novel videos DO NOT need to be added to the config.yaml file**. You can simply have a folder elsewhere on your computer and pass the video folder (then it will analyze all videos of the specified type (i.e. ``videotype='.mp4'``), or pass the path to the **folder** or exact video(s) you wish to analyze:
```python
deeplabcut.analyze_videos(config_path, ['/fullpath/project/videos/'], videotype='.mp4', auto_track=True)
```
#### IF auto_track = True:
- *NEW* in 2.2.0.3+: `deeplabcut.analyze_videos` has a new argument `auto_track=True`, chaining pose estimation, tracking, and stitching in a single function call with defaults we found to work well. Thus, you'll now get the `.h5` file you might be used to getting in standard DLC. If `auto_track=False`, one must run `convert_detections2tracklets` and `stitch_tracklets` manually (see below), granting more control over the last steps of the workflow (ideal for advanced users).
#### IF auto_track = False:
- You can validate the tracking parameters. Namely, you can iteratively change the parameters, run `convert_detections2tracklets` then load them in the GUI (`refine_tracklets`) if you want to look at the performance. If you want to edit these, you will need to open the `inference_cfg.yaml` file (or click button in GUI). The options are:
```python
# Tracking:
#p/m pixels in width and height for increasing bounding boxes.
boundingboxslack : 0
# Intersection over Union (IoU) threshold for linking two bounding boxes
iou_threshold: .2
# maximum duration of a lost tracklet before it's considered a "new animal" (in frames)
max_age: 100
# minimum number of consecutive frames before a detection is tracked
min_hits: 3
```
- **IMPORTANT POINT FOR SUPERVISED IDENTITY TRACKING**
If the network has been trained to learn the animals' identities (i.e., you set `identity=True` in config.yaml before training) this information can be leveraged both during: (i) animal assembly, where body parts are grouped based on the animal they are predicted to belong to (affinity between pairs of keypoints is no longer considered in that case); and (ii) animal tracking, where identity only can be utilized in place of motion trackers to form tracklets.
To use this ID information, simply pass:
```python
deeplabcut.convert_detections2tracklets(..., identity_only=True)
```
- **Note:** If only one individual is to be assembled and tracked, assembly and tracking are skipped, and detections are treated as in single-animal projects; i.e., it is the keypoints with highest confidence that are kept and accumulated over frames to form a single, long tracklet. No action is required from users, this is done automatically.
**Animal assembly and tracking quality** can be assessed via `deeplabcut.utils.make_labeled_video.create_video_from_pickled_tracks`. This function provides an additional diagnostic tool before moving on to refining tracklets.
If animal assemblies do not look pretty, an alternative to the outlier search described above is to pass the
`_assemblies.pickle` to `find_outliers_in_raw_data` in place of the `_full.pickle`.
This will focus the outlier search on unusual assemblies (i.e., animal skeletons that were oddly reconstructed). This may be a bit more sensitive with crowded scenes or frames where animals interact closely.
Note though that at that stage it is likely preferable anyway to carry on with the remaining steps, and extract outliers
from the final h5 file as was customary in single animal projects.
**Next, tracklets are stitched to form complete tracks with:
```python
deeplabcut.stitch_tracklets(config_path, ['videofile_path'], videotype='mp4',
shuffle=1, trainingsetindex=0)
```
Note that the base signature of the function is identical to `analyze_videos` and `convert_detections2tracklets`.
If the number of tracks to reconstruct is different from the number of individuals
originally defined in the config.yaml, `n_tracks` (i.e., the number of animals you have in your video)
can be directly specified as follows:
```python
deeplabcut.stitch_tracklets(..., n_tracks=n)
```
In such cases, file columns will default to dummy animal names (ind1, ind2, ..., up to indn).
### Using Unsupervised Identity Tracking:
In Lauer et al. 2022 we introduced a new method to do unsupervised reID of animals. Here, you can use the tracklets to learn the identity of animals to enhance your tracking performance. To use the code:
```python
deeplabcut.transformer_reID(config, videos_to_analyze, n_tracks=None, videotype="mp4")
```
Note you should pass the n_tracks (number of animals) you expect to see in the video.
### Refine Tracklets:
You can also optionally **refine the tracklets**. You can fix both "major" ID swaps, i.e. perhaps when animals cross, and you can micro-refine the individual body points. You will load the `...trackertype.pickle` or `.h5'` file that was created above, and then you can launch a GUI to interactively refine the data. This also has several options, so please check out the docstring. Upon saving the refined tracks you get an `.h5` file (akin to what you might be used to from standard DLC. You can also load (1) filter this to take care of small jitters, and (2) load this `.h5` this to refine (again) in case you find another issue, etc!
```python
deeplabcut.refine_tracklets(config_path, pickle_or_h5_file, videofile_path, max_gap=0, min_swap_len=2, min_tracklet_len=2, trail_len=50)
```
If you use the GUI (or otherwise), here are some settings to consider:
 *note, setting `max_gap=0` can be used to fill in all frames across the video; otherwise, 1-n is the # of frames you want to fill in, i.e. maybe you want to fill in short gaps of 5 frames, but 15 frames indicates another issue, etc. You can test this in the GUI very easy by editing the value and then re-launch pop-up GUI.
If you fill in gaps, they will be associated to an ultra low probability, 0.01, so you are aware this is not the networks best estimate, this is the human-override! Thus, if you create a video, you need to set your pcutoff to 0 if you want to see these filled in frames.
[Read more here!](functionDetails.md#madeeplabcut-critical-point---assemble--refine-tracklets)
Short demo:
*note, setting `max_gap=0` can be used to fill in all frames across the video; otherwise, 1-n is the # of frames you want to fill in, i.e. maybe you want to fill in short gaps of 5 frames, but 15 frames indicates another issue, etc. You can test this in the GUI very easy by editing the value and then re-launch pop-up GUI.
If you fill in gaps, they will be associated to an ultra low probability, 0.01, so you are aware this is not the networks best estimate, this is the human-override! Thus, if you create a video, you need to set your pcutoff to 0 if you want to see these filled in frames.
[Read more here!](functionDetails.md#madeeplabcut-critical-point---assemble--refine-tracklets)
Short demo:

### Once you have analyzed video data (and refined your maDeepLabCut tracklets):
Firstly, Here are some tips for scaling up your video analysis, including looping over many folders for batch processing: https://github.com/DeepLabCut/DeepLabCut/wiki/Batch-Processing-your-Analysis
You can also filter the predicted bodyparts by:
```python
deeplabcut.filterpredictions(config_path,['/fullpath/project/videos/reachingvideo1.avi'])
```
Note, this creates a file with the ending filtered.h5 that you can use for further analysis. This filtering step has many parameters, so please see the full docstring by typing: ``deeplabcut.filterpredictions?``
### Plotting Results:
- **NOTE :bulb::mega::** Before you create a video, you should set what threshold to use for plotting. This is set in the `config.yaml` file as `pcutoff` - if you have a well trained network, this should be high, i.e. set it to `0.8` or higher! IF YOU FILLED IN GAPS, you need to set this to `0` to "see" the filled in parts.
- You can also determine a good `pcutoff` value by looking at the likelihood plot created during `plot_trajectories`:
Plot the outputs:
```python
deeplabcut.plot_trajectories(config_path,['/fullpath/project/videos/reachingvideo1.avi'],filtered = True)
```
Create videos:
```python
deeplabcut.create_labeled_video(config_path, [videos], videotype='avi', shuffle=1, trainingsetindex=0, filtered=False, fastmode=True, save_frames=False, keypoints_only=False, Frames2plot=None, displayedbodyparts='all', displayedindividuals='all', codec='mp4v', outputframerate=None, destfolder=None, draw_skeleton=False, trailpoints=0, displaycropped=False, color_by='bodypart', track_method='')
```
- **NOTE :bulb::mega::** You have a lot of options in terms of video plotting (quality, display type, etc). We recommend checking the docstring!
(more details [here](functionDetails.md#i-video-analysis-and-plotting-results))
### HELP:
In ipython/Jupyter notebook:
```
deeplabcut.nameofthefunction?
```
In python or pythonw:
```
help(deeplabcut.nameofthefunction)
```
## Tips for "daily" use:
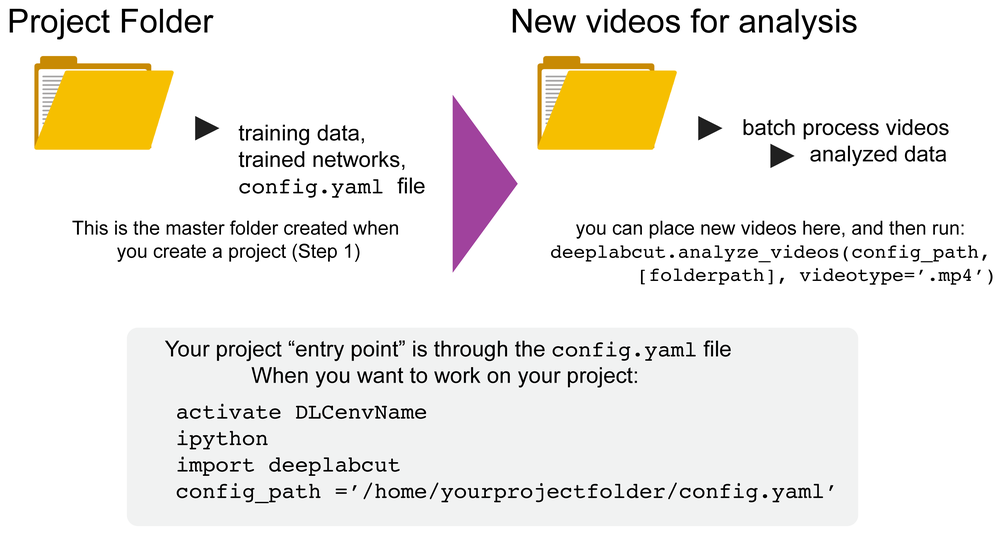
You can always exit an conda environment and easily jump back into a project by simply:
Linux/MacOS formatting example:
```
source activate yourdeeplabcutEnvName
ipython or pythonw
import deeplabcut
config_path ='/home/yourprojectfolder/config.yaml'
```
Windows formatting example:
```
activate yourdeeplabcutEnvName
ipython
import deeplabcut
config_path = r'C:\home\yourprojectfolder\config.yaml'
```
Now, you can run any of the functions described in this documentation.
# Getting help with maDLC:
- If you have a detailed question about how to use the code, or you hit errors that are not "bugs" but you want code assistance, please post on the [](https://forum.image.sc/tags/deeplabcut)
- If you have a quick, short question that fits a "chat" format:
[](https://gitter.im/DeepLabCut/community?utm_source=badge&utm_medium=badge&utm_campaign=pr-badge)
- If you want to share some results, or see others:
[](https://twitter.com/DeepLabCut)
- If you have a code bug report, please create an issue and show the minimal code to reproduce the error: https://github.com/DeepLabCut/DeepLabCut/issues
- if you are looking for resources to increase your understanding of the software and general guidelines, we have an open source, free course: http://DLCcourse.deeplabcut.org.
**Please note:** what we cannot do is provided support or help designing your experiments and data analysis. The number of requests for this is too great to sustain in our inbox. We are happy to answer such questions in the forum as a community, in a scalable way. We hope and believe we have given enough tools and resources to get started and to accelerate your research program, and this is backed by the >700 citations using DLC, 2 clinical trials by others, and countless applications. Thus, we believe this code works, is accessible, and with limited programming knowledge can be used. Please read our [Missions & Values statement](mission-and-values) to learn more about what we DO hope to provide you.