# Clustering in the napari-DeepLabCut GUI
To increase model performance, one can find the errors in the user-defined label (or in output H5 files after video inference). You can correct the errors and add them back into the training dataset, a process called active learning.
User errors can be detrimental to model performance, so beyond just `check_labels`, this tool allows you to find your mistakes. If you are curious about how errors affect performance, read the paper: [A Primer on Motion Capture with Deep Learning: Principles, Pitfalls, and Perspectives](https://www.sciencedirect.com/science/article/pii/S0896627320307170).
**TL;DR: your data quality matters!**
 ```{Hint}
**Labeling Pitfalls: How Corruptions Affect Performance**
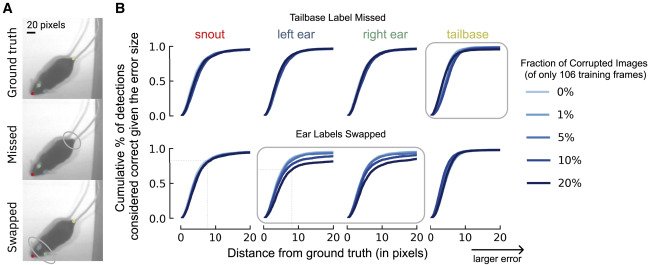
(A) Illustration of two types of labeling errors. Top is ground truth, middle is missing a label at the tailbase, and bottom is if the labeler swapped the ear identity (left to right, etc.). (B) Using a small training dataset of 106 frames, how do the corruptions in (A) affect the percent of correct keypoints (PCK) on the test set as the distance to ground truth increases from 0 pixels (perfect prediction) to 20 pixels (larger error)? The x axis denotes the difference in the ground truth to the predicted location (RMSE in pixels), whereas the y axis is the fraction of frames considered accurate (e.g., z80% of frames fall within 9 pixels, even on this small training dataset, for points that are not corrupted, whereas for swapped points this falls to z65%). The fraction of the dataset that is corrupted affects this value. Shown is when missing the tailbase label (top) or swapping the ears in 1%, 5%, 10%, and 20% of frames (of 106 labeled training images). Swapping versus missing labels has a more notable adverse effect on network performance.
```
The DeepLabCut toolbox supports **active learning** by extracting outlier frames be several methods and allowing the user to correct the frames, then retrain the model. See the [Nature Protocols paper](https://www.nature.com/articles/s41596-019-0176-0) for the detailed steps, or in the docs, [here](https://deeplabcut.github.io/DeepLabCut/docs/standardDeepLabCut_UserGuide.html#m-optional-active-learning-network-refinement-extract-outlier-frames).
To facilitate this process, here we propose a new way to detect 'outlier frames', which is planned to be released in ~Sept 2022. Your contributions and suggestions are welcomed, so test the [PR](https://github.com/DeepLabCut/napari-deeplabcut/pull/38) and give us feedback!
This #cookbook recipe aims to show a usecase of **clustering in napari** and is contributed by 2022 DLC AI Resident [Sabrina Benas](https://twitter.com/Sabrineiitor) 💜.
## Detect Outliers to Refine Labels
### Open `napari` and the `DeepLabCut plugin`
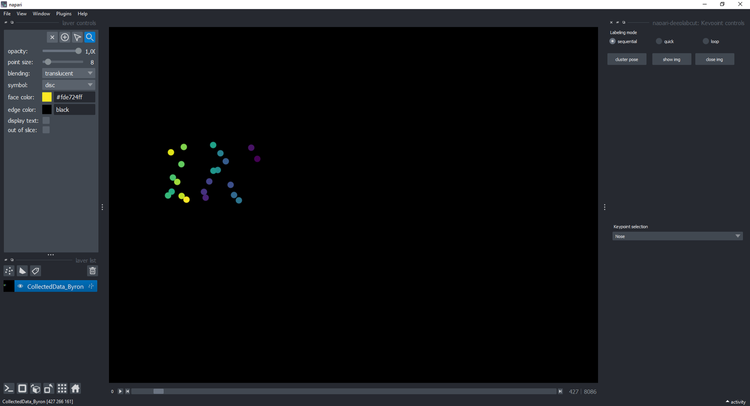
- Then open your `CollectedData_.h5` file. We used the Horse-30 dataset, presented in [Mathis, Biasi et al. WACV 2022](http://horse10.deeplabcut.org/), as our demo and development set. Here is an example of what it should look like:
```{Hint}
**Labeling Pitfalls: How Corruptions Affect Performance**
(A) Illustration of two types of labeling errors. Top is ground truth, middle is missing a label at the tailbase, and bottom is if the labeler swapped the ear identity (left to right, etc.). (B) Using a small training dataset of 106 frames, how do the corruptions in (A) affect the percent of correct keypoints (PCK) on the test set as the distance to ground truth increases from 0 pixels (perfect prediction) to 20 pixels (larger error)? The x axis denotes the difference in the ground truth to the predicted location (RMSE in pixels), whereas the y axis is the fraction of frames considered accurate (e.g., z80% of frames fall within 9 pixels, even on this small training dataset, for points that are not corrupted, whereas for swapped points this falls to z65%). The fraction of the dataset that is corrupted affects this value. Shown is when missing the tailbase label (top) or swapping the ears in 1%, 5%, 10%, and 20% of frames (of 106 labeled training images). Swapping versus missing labels has a more notable adverse effect on network performance.
```
The DeepLabCut toolbox supports **active learning** by extracting outlier frames be several methods and allowing the user to correct the frames, then retrain the model. See the [Nature Protocols paper](https://www.nature.com/articles/s41596-019-0176-0) for the detailed steps, or in the docs, [here](https://deeplabcut.github.io/DeepLabCut/docs/standardDeepLabCut_UserGuide.html#m-optional-active-learning-network-refinement-extract-outlier-frames).
To facilitate this process, here we propose a new way to detect 'outlier frames', which is planned to be released in ~Sept 2022. Your contributions and suggestions are welcomed, so test the [PR](https://github.com/DeepLabCut/napari-deeplabcut/pull/38) and give us feedback!
This #cookbook recipe aims to show a usecase of **clustering in napari** and is contributed by 2022 DLC AI Resident [Sabrina Benas](https://twitter.com/Sabrineiitor) 💜.
## Detect Outliers to Refine Labels
### Open `napari` and the `DeepLabCut plugin`
- Then open your `CollectedData_.h5` file. We used the Horse-30 dataset, presented in [Mathis, Biasi et al. WACV 2022](http://horse10.deeplabcut.org/), as our demo and development set. Here is an example of what it should look like:
 ### Clustering
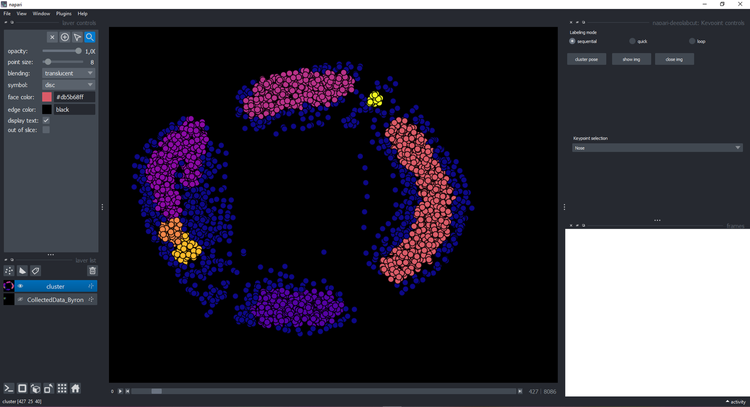
- Click on the button `cluster` and wait a few seconds until it displays a new layer with the cluster:
### Clustering
- Click on the button `cluster` and wait a few seconds until it displays a new layer with the cluster:
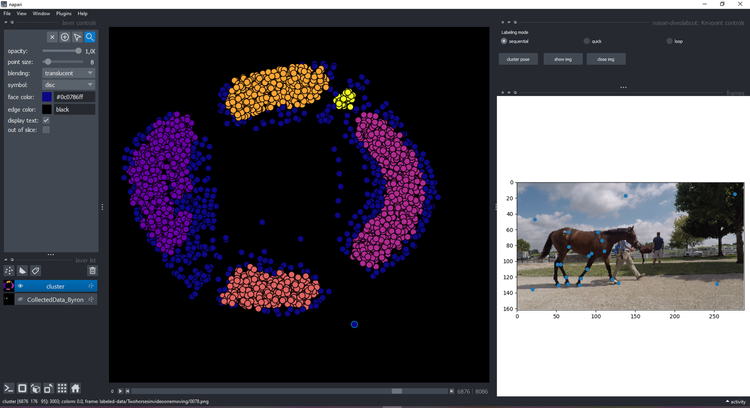
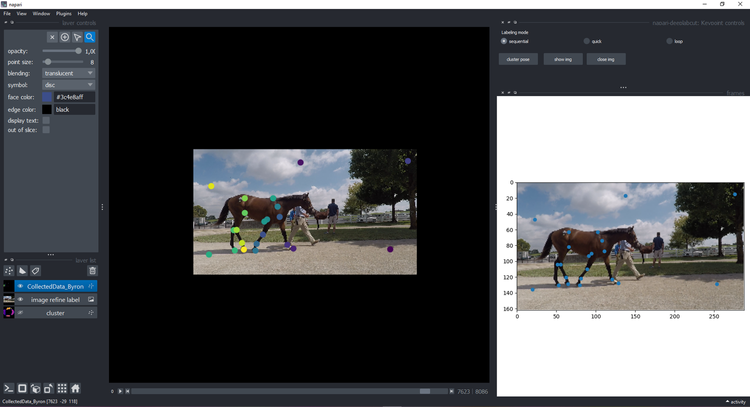
 You can click on a point and see the image on the right with the keypoints:
 ### Visualize & refine
If you decided to refine that frame (we moved the points to make outliers obvious), click `show img` and refine them using the plugin features and instructions:
### Visualize & refine
If you decided to refine that frame (we moved the points to make outliers obvious), click `show img` and refine them using the plugin features and instructions:
 ```{Attention}
When you're done, you need to click `ctl-s` to save it.
```
- You can go back to the cluster layer by clicking on `close img` and refine another image. Reminder, when you're done editing you need to click `ctl-s` to save your work. And now you can take the updated `CollectedData` file, create and **new training shuffle**, and train the network! Read more about how to [create a training dataset](https://deeplabcut.github.io/DeepLabCut/docs/standardDeepLabCut_UserGuide.html#f-create-training-dataset-s).
```{hint}
If you want to change the clustering method, you can modify the file [kmeans.py](https://github.com/DeepLabCutAIResidency/napari-deeplabcut/blob/cluster1/src/napari_deeplabcut/kmeans.py)
::::{important}
You have to keep the way the file is opened (pandas dataframe) and the output has to be the cluster points, the points colors in the cluster colors and the frame names (in this order).
::::
```
### What's coming
- Right now we demo the feature with user-labels, which are always worth checking and correcting for the best models!
- Next, we will support the machine-labeled.h5 files for full active learning support.
Happy Hacking!
```{Attention}
When you're done, you need to click `ctl-s` to save it.
```
- You can go back to the cluster layer by clicking on `close img` and refine another image. Reminder, when you're done editing you need to click `ctl-s` to save your work. And now you can take the updated `CollectedData` file, create and **new training shuffle**, and train the network! Read more about how to [create a training dataset](https://deeplabcut.github.io/DeepLabCut/docs/standardDeepLabCut_UserGuide.html#f-create-training-dataset-s).
```{hint}
If you want to change the clustering method, you can modify the file [kmeans.py](https://github.com/DeepLabCutAIResidency/napari-deeplabcut/blob/cluster1/src/napari_deeplabcut/kmeans.py)
::::{important}
You have to keep the way the file is opened (pandas dataframe) and the output has to be the cluster points, the points colors in the cluster colors and the frame names (in this order).
::::
```
### What's coming
- Right now we demo the feature with user-labels, which are always worth checking and correcting for the best models!
- Next, we will support the machine-labeled.h5 files for full active learning support.
Happy Hacking!