🥳 Get started with DeepLabCut: our key recommendations#
Below we will first outline what you need to get started, the different ways you can use DeepLabCut, and then the full workflow. Note, we highly recommend you also read and follow our Nature Protocols paper, which is (still) fully relevant to standard DeepLabCut.
Hint
💡📚 If you are new to Python and DeepLabCut, you might consider checking our beginner guide once you are ready to jump into using the DeepLabCut App!
Introduction#
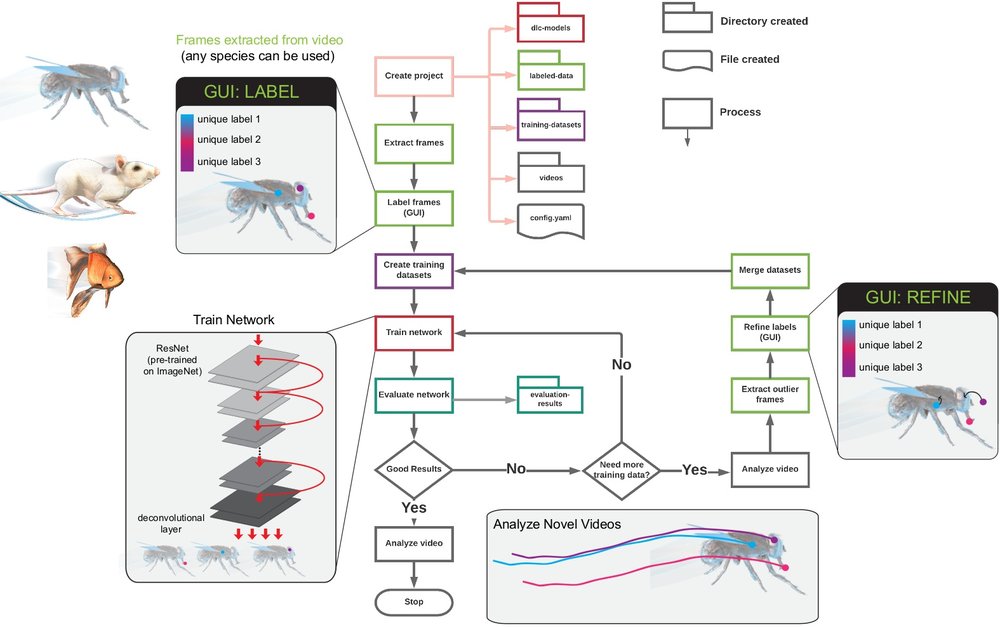
DeepLabCut is a software package for markerless pose estimation of animals performing various tasks. The software can manage multiple projects for various tasks. Each project is identified by the name of the project (e.g. TheBehavior), name of the experimenter (e.g. YourName), as well as the date at creation. This project folder holds a config.yaml (a text document) file containing various (project) parameters as well as links the data of the project.


Installing DeepLabCut#
We don’t cover installation in depth on this page, so click on the link above if that is what you are looking for. See below for details on getting started with DeepLabCut!
What we support#
We are primarily a package that enables deep learning-based pose estimation. We have a lot of models and options, but don’t get overwhelmed – the developer team has tried our best to “set the best defaults we possibly can”!
Main modes of DeepLabCut#
Decide on your needs: there are two main modes, standard DeepLabCut or multi-animal DeepLabCut.
We highly recommend carefully considering which one is best for your needs.
For example, a white mouse + black mouse would call for standard, while two black mice would use multi-animal. See important-info-regd-usage.
Then pick a user guide:
How to use standard DeepLabCut
How to use multi-animal DeepLabCut
To note, as of DLC3+ the single and multi-animal code bases are more integrated and we support top-down, bottom-up, and a new “hybrid” approach that is state-of-the-art, called BUCTD (bottom-up conditional top down)
If these terms are new to you, check out our Primer on Motion Capture with Deep Learning!. In brief, both work for single or multiple animals and each method can be better or worse on your data.

Here is more information on BUCTD:

Additional learning resources#
Video tutorials: video tutorials that demonstrate various aspects of using the code base.
Explanations: resources on understanding how DeepLabCut works
References: read the science behind DeepLabCut
Beginner’s guide to the GUI: a step-by-step walkthrough of the GUI for new users.
What you need to get started#
A set of videos that span the types of behaviors you want to track. Having 10 videos that include different backgrounds, different individuals, and different postures is MUCH better than 1 or 2 videos of 1 or 2 different individuals (i.e. 10-20 frames from each of 10 videos is much better than 50-100 frames from 2 videos).
Ideally, a computer with a GPU. If you want to use DeepLabCut on your own computer for training and/or for many experiments, then you should get an NVIDIA GPU.
You can also use cloud computing resources, including COLAB (see how).
What you DON’T need to get started#
No specific cameras/videos are required; color, monochrome, etc., is all fine. If you can see what you want to measure, then this will work for you (given enough labeled data).
No specific computer is required (but see recommendations above), our software works on Linux, Windows, and MacOS.
Workflow overview#
This page contains a list of the essential functions of DeepLabCut as well as demos. There are many optional parameters with each described function. For detailed function documentation, please refer to the main user guides or API documentation. For additional assistance, you can use the help function to better understand what each function does.
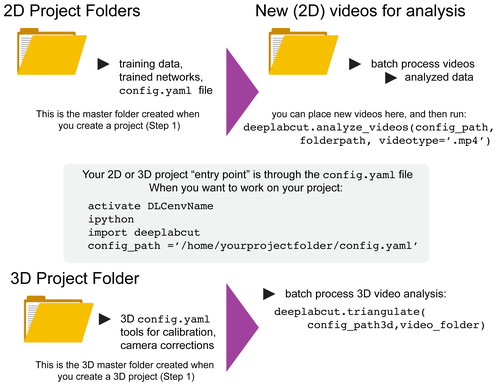
You can have as many projects on your computer as you wish. You can have DeepLabCut installed in a conda environment; once you are finished, exit your terminal, and later re-activate your environment.
When working on a given project, you just need to point to the correct config.yaml file to resume work; the documentation below will take you through the individual steps.
Usage advice & project types#
Tip
We recommend first using DeepLabCut for a single animal scenario to understand the workflow - even if it’s just our demo data. Multi-animal tracking is more complex - i.e. it has several decisions the user needs to make. Then, when you are ready you can jump into multi-animal mode.
First project: single or multi-animal?#
Which scenario do you have?
I have single animal videos:
Quick start: when you
create_new_project(and leave the default flag to False inmultianimal=False). This is the typical work path for a single animal project.
I have single animal videos, but I want to use the updated network capabilities introduced for multi-animal projects:
Quick start: when you
create_new_projectjust set the flagmultianimal=True.This enables you to use maDLC features even though you have only one animal. To note, this is rarely required for single animal projects, and not the recommended path.
Some tips for when you might want to use this:
This is good for e.g. a hand or a mouse if you feel the “skeleton” during training would increase performance.
Do not do this for things that could be identified as an individual objects. i.e., don’t do whisker 1, whisker 2, whisker 3 as 3 individuals. Each whisker always has a specific spatial location, and by calling them individuals the network will perform worse than in single animal mode.
I have multiple identical-looking animals in my videos:
Quick start: when you
create_new_projectset the flagmultianimal=True.If you can’t tell them apart, you can assign the “individual” ID to any animal in each frame. See this labeling w/2.2 demo video
I have multiple animals, but I can tell them apart, in my videos and want to use DLC2.2:
Quick start: when you
create_new_projectset the flagmultianimal=True.Always label the “individual” ID name the same; i.e. if you have mouse1 and mouse2 but mouse2 always has a miniscope, in every frame label mouse2 consistently. See this labeling w/2.2 demo video.
Then, you MUST put the following in the config.yaml file:
identity: true
Important
If you can tell them apart, label your animals consistently!
I have a pre-2.2 single animal project, but I want to use 2.2:
Please read the conversion to maDLC guide
Getting started with multi-animal (ma) DeepLabCut#
We highly recommend using it first in the Project Manager GUI. This will allow you to get used to the additional steps by being walked through the process. Then, you can always use all the functions in your favorite IDE, notebooks, etc.
How to run DeepLabCut#
There are several options to use DeepLabCut, and we recommend you pick the one that best suits your needs and experience level. You can always switch between them, so don’t worry about picking the “wrong” one.
Option 1: Demo notebooks: for a quick introduction to DLC on our data.
Option 2: Standalone GUI: is the perfect place for beginners who want to start using DeepLabCut on your own data.
Option 3: In the terminal: is best for more advanced users, as with the terminal interface you get the most versatility and options.
Option 1: Demo Jupyter notebooks#
We provide Jupyter and COLAB notebooks for using DeepLabCut on both a pre-labeled dataset, and on the end user’s own dataset. See all the demo’s here! Please note that GUIs are not easily supported in Jupyter in MacOS, as you need a framework build of python. While it’s possible to launch them with a few tweaks, we recommend using the Project Manager GUI or terminal, so please follow the instructions below.
Option 2: using the Project Manager GUI#
If you are using DeepLabCut on the cloud, you cannot use the GUIs.
Warning
On Windows: Open the terminal/cmd/anaconda prompt as Administrator (right click and select “Run as administrator”) to avoid permission issues during usage when downloading models, and for symlink support when videos are not copied into the project folder. Admin mode is not required for installation.
Simply open the terminal and type:
python -m deeplabcut
That’s it! Follow the GUI for details
Option 3: using the terminal#
Start iPython:
ipython
Import DeepLabCut:
import deeplabcut
Follow the instructions in the user guides for either standard or multi-animal DeepLabCut (see below).
Please decide which mode you want to use DeepLabCut with, and follow one of:
(1) How to use standard DeepLabCut
(2) How to use multi-animal DeepLabCut
Useful links#
Please read more in our Nature Protocols paper here.