Configuration file reference#
The pytorch_config.yaml file specifies the configuration for your PyTorch pose models,
from the model architecture to which optimizer will be used for training, how training
runs will be logged, the data augmentation that will be applied and which metric should
be used to save the “best” model snapshot.
You can create default configurations for a shuffle using
deeplabcut.create_training_set or deeplabcut.create_training_model_comparison. This
will create a pytorch_config.yaml file for your selected net type. The basic structure
of the file is as follows:
data:  # which data augmentations will be used
  ...
device: auto # the default device to use for training and evaluation
inference:  # configures inference-related parameters (multithreading, different torch options)
metadata:  # metadata regarding the project (bodyparts, individuals, paths, ...) - filled automatically
  ...
method: bu # indicates how pose predictions are made (bottom-up (`bu`) or top-down (`td`))
model:  # configures the model architecture (which backbone, heads, ...)
  ...
net_type: resnet_50 # the type of neural net configured in the file
runner:  # configuring the runner used for training
  ...
train_settings:  # generic training settings, such as batch size and maximum number of epochs
  ...
logger:  # optional: the configuration for a logger if you want one
resume_training_from:  # optional: restart the training at the specific checkpoint
Sections#
Singleton Parameters#
There are a few singleton parameters defined in the PyTorch configuration file:
device: The device to use for training/inference. The default isauto, which sets the device tocudaif an NVIDIA GPU is available, andcpuotherwise. For users running models on macOS with an M1/M2/M3 chip, this is set tompsfor certain models (not all operations are currently supported on Apple GPUs - so some models like HRNets need to be trained on CPU, while others like ResNets can take advantage of the GPU).method: Eitherbufor bottom-up models, ortdfor top-down models.net_type: The type of pose model configured by the file (e.g.resnet_50).
Data#
The data section configures:
bbox_margin: The margin (in pixels) to add around ground truth pose when generating bounding boxes. For more information, see generating bounding boxes from pose.colormode: in which format images are given to the model (e.g.,RGB,BGR)inference: which transformations should be applied to images when running evaluation or inferencetrain: which transformations should be applied to images when training
The default configuration for a pose model is:
data:
  bbox_margin: 20
  colormode: RGB  # should never be changed
  inference:  # the augmentations to apply to images during inference
    normalize_images: true  # this should always be set to true
  train:
    affine:
      p: 0.5
      rotation: 30
      scaling: [0.5, 1.25]
      translation: 0
    covering: true
    crop_sampling:
      width: 448   # if your images are very small or very large, you may need to edit!
      height: 448  # see below for more information about crop_sampling!
      max_shift: 0.1
      method: hybrid
    gaussian_noise: 12.75
    motion_blur: true
    normalize_images: true  # this should always be set to true
The following transformations are available for the train and inference keys.
Affine: Applies an affine (rotation, translation, scaling) transformation to the images.
affine:
  p: 0.9  # float: the probability that an affine transform is applied
  rotation: 30  # int: the maximum angle of rotation applied to the image (in degrees)
  scaling: [ 0.5, 1.25 ]  # [float, float]: the (min, max) scale to use to resize images
  translation: 40  # int: the maximum translation to apply to images (in pixels)
Auto-Padding: Pads the image to some desired shape (e.g., a minimum height/width or
such that the height/width are divisible by a given number). Some backbones (such as
HRNets) require the height and width of images to be multiples of 32. Setting up
auto-padding with pad_height_divisor: 32 and pad_width_divisor: 32 ensures that is
the case. Note that not all keys need to be set! The values shown are the default
values. Only one of ‘min_height’ and ‘pad_height_divisor’ parameters must be set, and
only one of ‘min_width’ and ‘pad_width_divisor’ parameters must be set.
auto_padding:
  min_height: null  # int: if not None, the minimum height of the image
  min_width: null  # int: if not None, the minimum width of the image
  pad_height_divisor: null  # int: if not None, ensures image height is dividable by value of this argument.
  pad_width_divisor: null  # int: if not None, ensures image width is dividable by value of this argument.
  position: random  # str: position of the image, one of 'A.PadIfNeeded.Position'
  border_mode: reflect_101  # str: 'constant' or 'reflect_101' (see cv2.BORDER modes)
  border_value: null  # str: padding value if border_mode is 'constant'
  border_mask_value: null  # str: padding value for mask if border_mode is 'constant'
Covering: Based on Albumentations’s CoarseDropout augmentation, this “cuts” holes out of the image. As defined in Improved Regularization of Convolutional Neural Networks with Cutout.
covering: true # bool: if true, applies a coarse dropout with probability 50%
Gaussian Noise: Applies gaussian noise to the input image. Can either be a float (the standard deviation of the noise) or simply a boolean (the standard deviation of the noise will be set as 12.75).
gaussian_noise: 12.75 # bool, float: add gaussian noise
Horizontal Flips: This flips the image horizontally around the y-axis. As the
resulting image is mirrored, it does not preserve labels (the left hand would become the
right hand, and vice versa). This augmentation should not be used for pose models if you
have symmetric keypoints! However, it is safe to use it to train detectors. If you want
to use horizontal flips with symmetric keypoints, you need to specify them through the
symmetries parameter!
# augmentation for object detectors or when no symmetric (left/right) keypoints exist:
hflip: true

# augmentation if your bodyparts are [snout, eye_L, eye_R, ear_L, ear_R]
hflip:
  p: 0.5  # apply a horizontal flip with 50% probability
  symmetries: [[1, 2], [3, 4]]  # the indices of symmetric keypoints
Histogram Equalization: Applies histogram equalization with probability 50%.
hist_eq: true # bool: whether to apply histogram equalization
Motion Blur: Applies motion blur to the image with probability 50%.
motion_blur: true # bool: whether to apply motion blur
Normalization: This should always be set to true.
normalize_images: true # normalizes images
Dealing with Variable Image Sizes#
Note
When training with batch size 1 (or if all images in your dataset have the same size),
you don’t need to worry about any of this! However, you can still use crop_sampling
which may help your model generalize.
When training with a batch size greater than 1, all images in a batch must have the
same size. PyTorch collates all images into one tensor of shape [b, c, h, w],
where b is the batch size, c the number of channels in the image, h and w the
height and width of images in the batches. There are a few different ways to ensure that
all images in a batch have the same size:
Crop sampling. This is the default behavior for the PyTorch engine in DeepLabCut. A part of each image (of a fixed size) is cropped and given to the model to train. See below for more information.
A custom collate function. Collate functions define a way that images of different sizes can be combined into one tensor. This involves resizing and padding images to the same size and aspect ratio. Available collate functions are defined in
deeplabcut/pose_estimation_pytorch/data/collate.py.Resizing all images. All images can simply be resized to the same size. This usually doesn’t lead to the best performance.
Resizing - Crop Sampling: An alternative way to ensure all images have the same size
is through cropping. The crop_sampling crops images down to a maximum width and
height, with options to sample the center of the crop according to the positions of the
keypoints. The methods to sample the center of the crop are as follows:
uniform: randomly over the imagekeypoints: randomly over the annotated keypointsdensity: weighing preferentially dense regions of keypointshybrid: alternating randomly betweenuniformanddensity
crop_sampling:
  height: 400  # int: the height of the crop
  width: 400  # int: the height of the crop
  max_shift: 0.4  # float: maximum allowed shift of the cropping center position as a fraction of the crop size.
  method: hybrid # str: the center sampling method (one of 'uniform', 'keypoints', 'density', 'hybrid')
Collate: Defines how images are collated into batches. The default way collate
function to use is ResizeFromDataSizeCollate (other collate functions are defined in
deeplabcut/pose_estimation_pytorch/data/collate.py). For each batch to collate, this
implementation:
Selects the target width & height all images will be resized to by getting the size of the first image in the batch, and multiplying it by a scale sampled uniformly at random from
(min_scale, max_scale).Resizes all images in the batch (while preserving their aspect ratio) such that they are the smallest size such that the target size fits entirely in the image.
Crops each resulting image into the target size with a random crop.
collate:  # rescales the images when putting them in a batch
  type: ResizeFromDataSizeCollate  # You can also use `ResizeFromListCollate`
  max_shift: 10  # the maximum shift, in pixels, to add to the random crop (this means
    # there can be a slight border around the image)
  max_size: 1024  #  the maximum size of the long edge of the image when resized. If the
    # longest side will be greater than this value, resizes such that the longest side
    # is this size, and the shortest side is smaller than the desired size. This is
    # useful to keep some information from images with extreme aspect ratios.
  min_scale: 0.4  # the minimum scale to resize the image with
  max_scale: 1.0  # the maximum scale to resize the image with
  min_short_side: 128  # the minimum size of the target short side
  max_short_side: 1152  # the maximum size of the target short side
  multiple_of: 32  # pads the target height, width such that they are multiples of 32
  to_square: false  # instead of using the aspect ratio of the first image, only the
    # short side of the first image will be used to sample a "side", and the images will
    # be cropped in squares
Resizing: Resizes the images while preserving the aspect ratio (first resizes to the maximum possible size, then adds padding for the missing pixels).
resize:
  height: 640 # int: the height to which all images will be resized
  width: 480 # int: the width to which all images will be resized
  keep_ratio: true  # bool: whether the aspect ratio should be preserved when resizing
Model#
The model configuration is further split into a backbone, optionally a neck and a
number of heads.
Changing the model configuration should only be done by expert users, and in rare
occasions. When updating a model configuration (e.g. adding more deconvolution layers
to a HeatmapHead) must be done in a way where the model configuration still makes
sense for the project (e.g. the number of heatmaps output needs to match the number of
bodyparts in the project).
An example model configuration for a single-animal HRNet would look something like:
model:
  backbone:  # the BaseBackbone used by the pose model
    type: HRNet
    model_name: hrnet_w18  # creates an HRNet W18 backbone
  backbone_output_channels: 18
  heads:  # configures how the different heads will make predictions
    bodypart:  # configures how pose will be predicted for bodyparts
      type: HeatmapHead
      predictor:  # the BasePredictor used to make predictions from the head's outputs
        type: HeatmapPredictor
          ...
      target_generator:  # the BaseTargetGenerator used to create targets for the head
        type: HeatmapPlateauGenerator
          ...
      criterion:  # the loss criterion used for the head
        ...
      ...  # head-specific options, such as `heatmap_config` or `locref_config` for a "HeatmapHead"
The backbone, neck and head configurations are loaded using the
deeplabcut.pose_estimation_pytorch.models.backbones.base.BACKBONES,
deeplabcut.pose_estimation_pytorch.models.necks.base.NECKS and
deeplabcut.pose_estimation_pytorch.models.heads.base.HEADS registries. You specify
which type to load with the type parameter. Any argument for the head can then be used
in the configuration.
So to use an HRNet backbone for your model (as defined in
deeplabcut.pose_estimation_pytorch.models.backbones.hrnet.HRNet), you could set:
model:
  backbone:
    type: HRNet
    model_name: hrnet_w32  # creates an HRNet W32
    pretrained: true  # the backbone weights for training will be loaded from TIMM (pre-trained on ImageNet)
    interpolate_branches: false  # don't interpolate & concatenate channels from all branches
    increased_channel_count: true  # use the incre_modules defined in the TIMM HRNet
  backbone_output_channels: 128  # number of channels output by the backbone
Runner#
The runner contains elements relating to the training runner to use (including the optimizer and learning rate schedulers). Unless you’re experienced with machine learning and training models it is not recommended to change the optimizer or scheduler.
runner:
  type: PoseTrainingRunner  # should not need to modify this
  key_metric: "test.mAP"  # the metric to use to select the "best snapshot"
  key_metric_asc: true  # whether "larger=better" for the key_metric
  eval_interval: 1  # the interval between each passes through the evaluation dataset
  optimizer:  # the optimizer to use to train the model
    ...
  scheduler:  # optional: a learning rate scheduler
    ...
  load_scheduler_state_dict: true/false # whether to load scheduler state when resuming training from a snapshot,
  snapshots:  # parameters for the TorchSnapshotManager
    max_snapshots: 5  # the maximum number of snapshots to save (the "best" model does not count as one of them)
    save_epochs: 25  # the interval between each snapshot save
    save_optimizer_state: false  # whether the optimizer state should be saved with the model snapshots (very little reason to set to true)
  gpus: # GPUs to use to train the network
  - 0
  - 1
Key metric: Every time the model is evaluated on the test set, metrics are computed
to see how the model is performing. The key metric is used to determine whether the
current model is the “best” so far. If it is, the snapshot is saved as ...-best.pt.
For pose models, metrics to choose from would be test.mAP (with key_metric_asc: true
) or test.rmse (with key_metric_asc: false).
Evaluation interval: Evaluation slows down training (it takes time to go through all
the evaluation images, make predictions and log results!). So instead of evaluating
after every epoch, you could decide to evaluate every 5 epochs (by setting
eval_interval: 5). While this means you get coarser information about how your model
is training, it can speed up training on large datasets.
Optimizer: Any optimizer inheriting torch.optim.Optimizer. More information about
optimizers can be found in PyTorch’s documentation. Examples:
  # SGD with initial learning rate 1e-3 and momentum 0.9
  #  see https://pytorch.org/docs/stable/generated/torch.optim.SGD.html
  optimizer:
    type: SGD
    params:
      lr: 1e-3
      momentum: 0.9

  # AdamW optimizer with initial learning rate 1e-4
  #  see https://pytorch.org/docs/stable/generated/torch.optim.AdamW.html
  optimizer:
    type: AdamW
    params:
      lr: 1e-4
Scheduler: You can use any scheduler defined in
torch.optim.lr_scheduler, where the arguments given are arguments of the scheduler.
The default scheduler is an LRListScheduler, which changes the learning rates at each
milestone to the corresponding values in lr_list. Examples:
  # reduce to 1e-5 at epoch 160 and 1e-6 at epoch 190
  scheduler:
    type: LRListScheduler
    params:
      lr_list: [ [ 1e-5 ], [ 1e-6 ] ]
      milestones: [ 160, 190 ]

  # Decays the learning rate of each parameter group by gamma every step_size epochs
  #   see https://pytorch.org/docs/stable/generated/torch.optim.lr_scheduler.StepLR.html
  scheduler:
    type: StepLR
    params:
      step_size: 100
      gamma: 0.1
You can also use schedulers that use other schedulers as parameters, such as a
ChainedScheduler
or a SequentialLR.
The SequentialLR can be particularly useful, such as to use a first scheduler for some
warmup epochs, and a second scheduler later. An example usage would be:
  # Multiply the learning rate by `factor` for the first `total_iters` epochs
  # After 5 epochs, start decaying the learning rate by `gamma` every `step_size` epochs
  # If the initial learning rate is set to 1, the learning rates will be:
  #   epoch 0: 0.01  - using ConstantLR
  #   epoch 1: 0.01  - using ConstantLR
  #   epoch 2: 1.0   - using ConstantLR
  #   epoch 3: 1.0   - using ConstantLR
  #   epoch 4: 1.0   - using ConstantLR
  #   epoch 5: 1.0   - using StepLR
  #   epoch 6: 1.0   - using StepLR
  #   epoch 7: 0.1   - using StepLR
  #   epoch 8: 0.1   - using StepLR
  scheduler:
    type: SequentialLR
    params:
      schedulers:
      - type: ConstantLR
        params:
          factor: 0.01
          total_iters: 2
      - type: StepLR
        params:
          step_size: 2
          gamma: 0.1
      milestones:
      - 5
Train Settings#
The train_settings key contains parameters that are specific to training. For more
information about the dataloader_workers and dataloader_pin_memory settings, see
Single- and Multi-process Data Loading
and memory pinning. Setting
dataloader_workers: 0 uses single-process data loading, while setting it to 1 or more
will use multi-process data loading. You should always keep
dataloader_pin_memory: true when training on an NVIDIA GPU.
train_settings:
  batch_size: 1  # the batch size used for training
  dataloader_workers: 0  # the number of workers for the PyTorch Dataloader
  dataloader_pin_memory: true  # pin DataLoader memory
  display_iters: 500  # the number of iterations (steps) between each log print
  epochs: 200  # the maximum number of epochs for which to train the model
  seed: 42  # the random seed to set for reproducibility
Logger#
Training runs are logged to the model folder (where the snapshots are stored) by default.
Additionally, you can log results to Weights and Biases, by adding a
WandbLogger. Just make sure you’re logged in to your wandb account before starting
your training run (with wandb login from your shell). For more information, see their
tutorials and their documentation for wandb.init.
Logging to wandb is a good way to keep track of what you’ve run, including performance
and metrics.
logger:
 type: WandbLogger
 project_name: my-dlc3-project  # the name of the project where the run should be logged
 run_name: dekr-w32-shuffle0  # the name of the run to log
 ...  # any other argument you can pass to `wandb.init`, such as `tags: ["dekr", "split=0"]`
If you set up a WandbLogger, the corresponding run info (entity, project, run_id)
will be saved in a wandb_info.yaml file in the model train directory, so that the WandB run
can be easily be recovered at a later stage.
You can also log images as they are seen by the model to wandb
with the image_log_interval. This logs a random train and test image, as well as the
targets and heatmaps for that image.
Restarting Training at a Specific Checkpoint#
If you wish to restart the training at a specific checkpoint, you can specify the
full path of the checkpoint to the resume_training_from variable, as shown below. In this
example, snapshot-010.pt will be loaded before training starts, and the model will
continue to train from the 10th epoch on.
# model configuration
...
# weights from which to resume training
resume_training_from: /Users/john/dlc-project-2021-06-22/dlc-models-pytorch/iteration-0/dlcJun22-trainset95shuffle0/train/snapshot-010.pt
When continuing to train a model, you may want to modify the learning rate scheduling
that was being used (by editing the configuration under the scheduler key). When doing
so, you must set load_scheduler_state_dict: false in your runner config!
Otherwise, the parameters for the scheduler your started training with will be loaded
from the state dictionary, and your edits might not be kept!
Inference#
The inference: block in pytorch_config.yaml allows configuring inference-specific
behavior for your model. It is independent of training settings and can include multiple
sub-configs, currently supporting multithreading, compile, autocast, and conditions.
Example
inference:
  multithreading:
    enabled: true
    queue_length: 4
    timeout: 30.0
  compile:
    enabled: false
    backend: "inductor"
  autocast:
    enabled: false
  conditions:
    config_path: /path/to/model-dir/pytorch_config.yaml
    snapshot_path: /path/to/model-dir/snapshot-best-150.pth
Sub-configs
multithreadingControls producer-consumer threading during inference for preprocessing and batching.enabled(bool): Enable/disable multithreading.queue_length(int): Maximum number of batches to queue between preprocessing and model prediction.timeout(float): Timeout in seconds for the preprocessing queue.
compileControls optionaltorch.compileusage during inference. Note: Usingtorch.compilemay speed up inference but introduces some initialization overhead. It is also known to fail in certain setups, environments, or architectures (e.g.,ctd_coam_*models). Use at your own risk.enabled(bool): Enable/disable compilation. Default:false.backend(str): Backend to use when compiling ("inductor","aot_eager", etc.).
autocastControls optional mixed precision during inference.enabled(bool): Enable/disabletorch.autocast. Default:false. Note: Enabling autocast may reduce inference accuracy. It is disabled by default.
conditionsOnly used for Conditional Top-Down (CTD) models to specify which conditions should be used during inference.
Training Top-Down Models#
Top-down models are split into two main elements: a detector (localizing individuals in the images) and a pose model predicting each individual’s pose (once localization is done, obtaining pose is just like getting pose in a single-animal model!).
The “pose” part of the model configuration is exactly the same as for single-animal or
bottom-up models (configured through the data, model, runner and train_settings
). The detector is configured through a detector key, at the top-level of the
configuration.
Detector Configuration#
When training top-down models, you also need to configure how the detector will be
trained. All information relating to the detector is placed under the detector key.
detector:
  data:  # which data augmentations will be used, same options as for the pose model
    colormode: RGB
    inference:  # default inference configuration for detectors
      normalize_images: true
    train:  # default train configuration for detectors
      affine:
        p: 0.9
        rotation: 30
        scaling: [ 0.5, 1.25 ]
        translation: 40
      hflip: true
      normalize_images: true
  model:  # the detector to train
    type: FasterRCNN
    variant: fasterrcnn_mobilenet_v3_large_fpn
    pretrained: true
  runner:  #  detector train runner configuration (same keys as for the pose model)
    type: DetectorTrainingRunner
    ...
  train_settings: # detector train settings (same keys as for the pose model)
    ...
  resume_training_from: # optional: restart the training at the specific checkpoint
Currently, the only detectors available are FasterRCNN and SSDLite. However, multiple variants of
FasterRCNN are available (you can view the different variants on
torchvision’s object detection page). It’s recommended to use the fastest
detector that brings enough performance. The recommended variants are the following
(from fastest to most powerful, taken from torchvision’s documentation):
name |
Box MAP (larger = more powerful) |
Params (larger = more powerful) |
GFLOPS (larger = slower) |
|---|---|---|---|
SSDLite |
21.3 |
3.4M |
0.58 |
fasterrcnn_mobilenet_v3_large_fpn |
32.8 |
19.4M |
4.49 |
fasterrcnn_resnet50_fpn |
37 |
41.8M |
134.38 |
fasterrcnn_resnet50_fpn_v2 |
46.7 |
43.7M |
280.37 |
Restarting Training of an Object Detector at a Specific Checkpoint#
If you wish to restart the training of a detector at a specific checkpoint, you can
specify the full path of the checkpoint to the detector’s resume_training_from variable, as
shown below. In this example, snapshot-detector-020.pt will be loaded before training
starts, and the model will continue to train from the 20th epoch on.
detector:
  # detector configuration
  ...
  # weights from which to resume training
  resume_training_from: /Users/john/dlc-project-2021-06-22/dlc-models-pytorch/iteration-0/dlcJun22-trainset95shuffle0/train/snapshot-detector-020.pt
When continuing to train a detector, you may want to modify the learning rate scheduling
that was being used (by editing the configuration under the scheduler key). When doing
so, you must set load_scheduler_state_dict: false in your detector: runner
config! Otherwise, the parameters for the scheduler your started training with will be
loaded from the state dictionary, and your edits might not be kept!
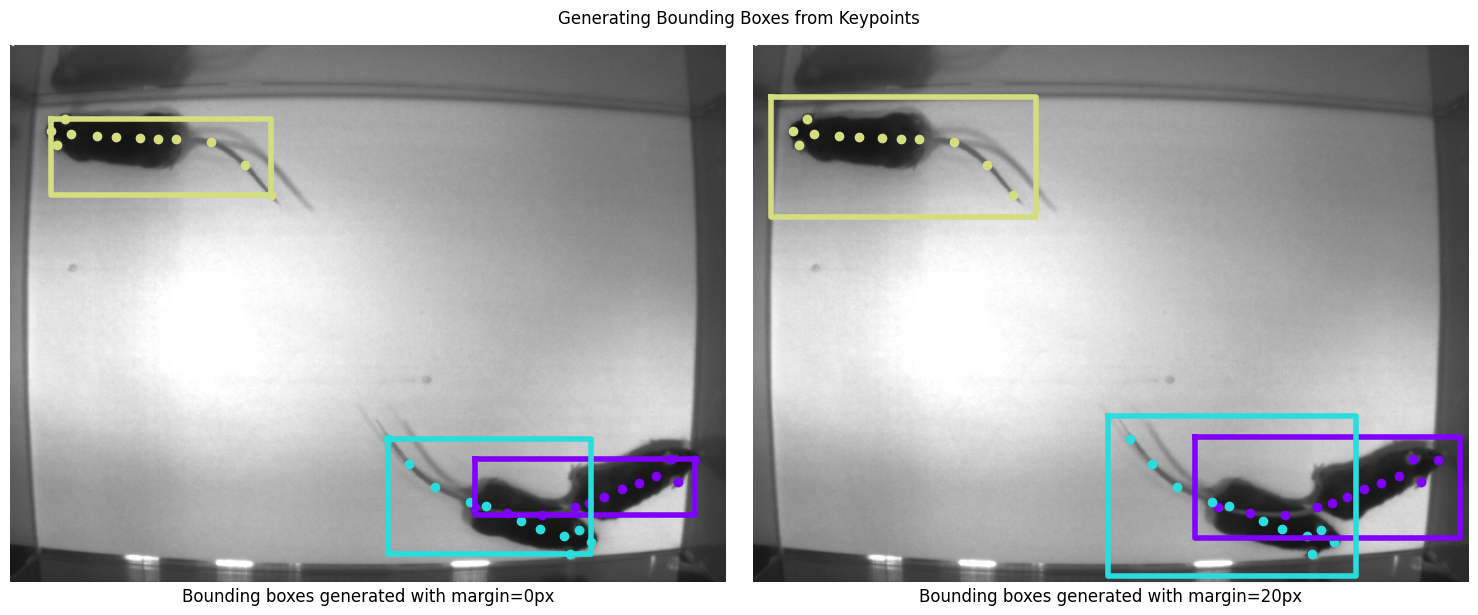
Generating Bounding Boxes from Pose#
To train object detection models (for top-down pose estimation), ground truth bounding boxes are needed. As they are not annotated in DeepLabCut, they are generated from the ground truth pose: simply take the minimum and maximum for the x and y axes, add a small margin and you have your bounding box! The default setting adds a margin of 20 pixels around the pose. This works well in most cases, but in some cases you should update this value (e.g. when you have very small or large images).
You can edit that value in the pytorch_config.yaml for your model through the
data: bbox_margin parameter for the detector:
detector:
  data:
    bbox_margin: 20
    ...