Installing DeepLabCut#
DeepLabCut can be run on Windows, Linux, or MacOS as long as you have Python 3.10-3.12 installed
See also technical considerations.
🚧 Please note, there are several possibilities for installation:
Recommended for most users: Install in a conda environment
Install with uv (recommended for developers)
In the supplied Docker container (recommended for Ubuntu advanced users and reproducibility).
🚀 You will get the best performance when using a GPU!
Please see the section on GPU support to install your GPU driver and CUDA.
Hint
Familiar with python packages and conda?
This assumes you have conda/mamba installed and this will install DeepLabCut in a fresh
environment.
If you have an NVIDIA GPU, install PyTorch according to their instructions (with your desired CUDA version) - you just need your GPU drivers installed.
conda create -n DEEPLABCUT python=3.12
conda activate DEEPLABCUT

# Install PyTorch with your desired CUDA version (or CPU only)
# Example: install GPU-enabled pytorch for CUDA 12.6
pip install torch torchvision --index-url https://download.pytorch.org/whl/cu126

# install the latest version of DeepLabCut
pip install deeplabcut # add --pre for pre-release versions!
# or if you want to use the GUI
pip install deeplabcut[gui]

# ONLY IF YOU HAVE A CUDA GPU - check that PyTorch can access your GPU; this
# should print `True`
python -c "import torch; print(torch.cuda.is_available())"
If you’re familiar with the command line and want TensorFlow support, look below.
Using Conda#

The installation process is as easy as the figure on the right!↘️
🚨 Before you start…#
Do you have a GPU? If yes, see the GPU support section below for installation instructions.
If not, you can still install DeepLabCut and use it on your CPU, but it will be much slower for training and evaluation (but not for labeling or project management).
🚨 Hardware information!
We recommend having a GPU if possible!
You need to decide if you want to use a CPU or GPU for your models
Great, jump to the next section below!
If you want to use your own GPU (i.e., a GPU is in your workstation), then you need to be sure you have a CUDA compatible GPU, CUDA, and cuDNN installed. Please note, which CUDA you install depends on what version of PyTorch you want to use. So, please check GPU Support below carefully. Note, DeepLabCut is up to date with the latest CUDA and PyTorch!
Install miniconda and use the standard
DEEPLABCUT.yamlconda environment — PyTorch will use your Apple GPU via Metal automatically. For TensorFlow, add thetfextra after install (see TensorFlow Support). More tips are on the installation tips page.Note, you can also use the CPU-only install for project management and labeling the data! Then, for example, use Google Colaboratory GPUs for free (read more here and there are a lot of helper videos on our YouTube channel!).
Step 1: Install miniconda#
Important
Download miniconda for your operating system
miniconda is an easy way to install Python and additional packages across various operating systems
With miniconda, you can install all the dependencies in an environment on your machine
Miniconda is a lightweight version of Anaconda that includes only conda and its dependencies.
Wait, why are we mixing Anaconda, miniconda and conda?
conda is the terminal-based environment management system that is included in both Anaconda and Miniconda. This is the actual workhorse that allows you to create and manage environments, and install packages.
Anaconda is a full-featured distribution that includes conda, Python, and a large number of scientific packages and their dependencies, plus some graphical user interfaces (GUIs) for managing environments and packages. It is a larger download and takes up more disk space.
Miniconda is a minimal distribution that includes only conda and its dependencies, along with Python. It does not include any additional packages or GUIs. We recommend it as most GUIs and base packages provided by the full Anaconda distribution are not necessary for DeepLabCut.
Step 2: Build a conda environment#
Use the DEEPLABCUT.yaml file to build a conda environment with all the dependencies for DeepLabCut.
You simply need to have this .yaml file locally on your computer.
Warning
On Windows, make sure you have git installed: Git for Windows
Follow the link ➡️ for the conda file and then click “…” and select Download
Now, in Terminal (or Anaconda Command Prompt for Windows users):
If you clicked to download, go to your downloads folder.
Be sure you are in the folder that has the
.yamlfile, then run:conda env create -f DEEPLABCUT.yaml
You can now use this environment from anywhere on your computer. Just activate your environment by running:
conda activate DEEPLABCUT
Now you should see (DEEPLABCUT) on the left of your terminal screen:
(DEEPLABCUT) YourName-MacBook...
Note
No need to run pip install deeplabcut, it’s already in the conda file!
TensorFlow support#
DeepLabCut TensorFlow Support
💡 PyTorch and TensorFlow Support within DeepLabCut
As of June 2024 we have a PyTorch Engine backend and we will be deprecating the
TensorFlow backend by version 3.2 latest (TBD).
Currently, if you want to use TensorFlow, you
need to run pip install deeplabcut[tf] in order to install the correct version of
TensorFlow in your conda env. Please note, we will be providing bug fixes, but we will
not be supporting new TensorFlow versions beyond version 2.18.
Installing TensorFlow manually and getting it to have access to the GPU can be a bit tricky. However, we try to simplify the installation procedure via optional dependencies.
A specific note for Windows users: TensorFlow’s own docs state that native Windows GPU support ended after 2.10. We recommend Windows users to install The Windows Subsystem for Linux (WSL) if they want GPU support.
Installation via the tf optional dependencies
We recommend installing DeepLabCut with TensorFlow by specifying one of the ‘extra’s’: tf, tf-cu11 or tf-cu12. E.g,
pip install deeplabcut[tf]
This table provides a more detailed summary on the available extras:
Extra |
Version |
Python |
GPU backend |
Role (summary) |
|---|---|---|---|---|
tf |
2.12–2.18 (Python-dependent) |
3.10-3.12 |
CUDA (Linux); Metal (macOS) |
Default TensorFlow stack for most users. |
tf-cu11 |
2.14 |
3.10 / 3.11 |
CUDA 11.8 |
Pinned TF for CUDA 11.x-era stack |
tf-cu12 |
2.18 |
3.10-3.12 |
CUDA 12.5 |
Pinned TF for CUDA 12.x-era stack |
tf-latest |
2.18+ |
3.10-3.12 |
CUDA 12.5+ |
(Not recommended!) Newest TensorFlow ≥ 2.18 |
apple_mchips |
2.12 - 2.18 |
3.10-3.12 |
macOS Metal |
(Not recommended!) Legacy extra; installs |
Note that TensorFlow and PyTorch may try to install competing CUDA-toolkit dependencies.
This is addressed in the listed extras by capping the PyTorch version to match the CUDA requirements.
In case you experience problems with the above installation, you can try to let TensorFlow install their own CUDA-toolkit libraries.
Please run the following installation command (in Linux), replacing
pip install "tensorflow[and-cuda]==<tf-version>"
Advanced manual setup (Linux):
if you do not use deeplabcut[tf], you must align the following dependencies yourself:
tensorflow, tensorpack, tf-keras / Keras, tf-slim, CUDA, the NVIDIA driver,
and PyTorch yourself.
Check TensorFlow’s compatibility matrix to know which version of CUDA and cuDNN you should install.
We have found that installing DeepLabCut with the following commands works well for Linux users to install PyTorch 2.3.1, TensorFlow 2.12, CUDA 11.8 and cuDNN 8 in a Conda environment:
conda create -n deeplabcut-with-tf "python=3.10"
conda activate deeplabcut-with-tf

# Install the desired TensorFlow version, built for CUDA 11.8 and cuDNN 8
pip install "tensorflow==2.12" "tensorpack>=0.11" "tf_slim>=1.1.0"

# Install PyTorch with a version using CUDA 11.8 and cuDNN 8
pip install "torch==2.3.1" torchvision --index-url https://download.pytorch.org/whl/cu118

# Create symbolic links to NVIDIA shared libraries for TensorFlow
#   -> as described in their installation docs:
#      https://www.tensorflow.org/install/pip#step-by-step_instructions

pushd $(dirname $(python -c 'print(__import__("tensorflow").__file__)'))
ln -svf ../nvidia/*/lib/*.so* .
popd

pip install  --pre deeplabcut
Step 3: Let’s run DeepLabCut!#
DeepLabCut is installed! 🎉💜
Launch the DeepLabCut GUI in your new conda env by running python -m deeplabcut
Head over to the User Guide Overview for information.
Warning
On Windows: Open the terminal/cmd/anaconda prompt as Administrator (right click and select “Run as administrator”) to avoid permission issues when downloading models, and for symlink support when videos are not copied into the project folder.
Conda environment management tips#
Here are some conda environment management tips: kapeli.com: Conda Cheat Sheet
Please see how to test your installation by following this video.
Other ways to install DeepLabCut#
git clone#
Recommended for users who want to modify the code, or want to be up-to-date with the latest code on GitHub.
To clone the repository run:
git clone https://github.com/DeepLabCut/DeepLabCut.gitThen follow the same steps as in Step 2 above, adjusting for the
DEEPLABCUT.yamlenv file now being in the folder where you git cloned the repo.Or use pip/uv to install from the cloned repo (see below).
uv (recommended for developers)#
Clone the repository
Install
uvfollowing instructions hereRun in the cloned repo:
uv venv -p 3.12
uv pip install -e '.[gui]' # Change optional installs as needed
source .venv/bin/activate # or & .venv\Scripts\activate.ps1 on Windows
Add
modelzoofor SuperAnimal models:uv pip install -e '.[gui,modelzoo]'.Add
tf(ortf-cu11/tf-cu12as appropriate) for the TensorFlow training engine — see TensorFlow Support.
pip#
If you already have a local environment, everything you need to use the project manager GUI, train and/or build custom models within DeepLabCut (i.e., use our source code and our dependencies) can be installed with pip install 'deeplabcut[gui]' (for GUI support w/PyTorch) or without the gui: pip install 'deeplabcut'.
If you cloned the repo and want to make edits to the code locally, navigate to the cloned repo folder and run
pip install -e .[gui]to install the package in “editable” mode, which allows you to make changes to the code and have those changes reflected when you import the package.If you want to use the SuperAnimal models, then please use
pip install 'deeplabcut[gui,modelzoo]'.If you need the TensorFlow training engine, add the
tfextra (ortf-cu11/tf-cu12as appropriate):pip install 'deeplabcut[tf]'— see TensorFlow Support.
Docker#
We also have docker containers. Docker is the most reproducible way to use and deploy code. Please see our dedicated docker package and page here.
Creating your own conda environment#
Tip
In a fresh ubuntu install, you will often have to run: sudo apt-get install gcc python3-dev to install the GNU Compiler Collection and the python developing environment.
Create a new conda environment with Python 3.10 (or 3.11, 3.12) by running:
conda create -n DLC python=3.10
Current version: The only thing you then need to add to the env is deeplabcut (
pip install deeplabcut) or pip install 'deeplabcut[gui]' if you are using the GUI, which includes the napari based labeling
interface.
Updating your installation#
If you ever want to update your DLC, just run pip install --upgrade deeplabcut (alongside optional needed requirements, e.g. [gui]) using your environment.
If you would like to use a specific release, then specify the version you want, such as pip install deeplabcut==3.0 and optional requirements.
Once installed, you can check the version by running:
import deeplabcut
deeplabcut.__version__
Don’t be afraid to update, DLC is backwards compatible with your 2.0+ projects and performance continues to get better and new features are added often.
Data compatibility#
All of the data you labelled in version 2.X is also compatible with version 3+ and the PyTorch engine! There is no change in the workflow or the way labels are handled: the big changes happen under-the-hood! If you’ve been working with DeepLabCut 2.X and want to learn more about moving to the PyTorch engine, check out our docs on moving from TensorFlow to PyTorch
GPU Support#
General GPU support#
Please ensure you have an NVIDIA GPU and the matching NVIDIA driver installed.
Warning
If you have a GPU, you should first install an appropriate driver for your specific GPU, then you can use the supplied conda file.
Drivers: see NVIDIA Drivers
CUDA: download here if needed. Installing the drivers usually allows you to skip installing CUDA; instead obtaining via the PyTorch installation process.
Installing CUDA and cuDNN for TensorFlow GPU support#
You will need an NVIDIA GPU that is compatible with CUDA.
To see a list of CUDA-enabled NVIDIA GPUs, please see their website.
Here we provide notes on how to install and check your GPU use with TensorFlow, which is used by DeepLabCut.
Install a driver for your GPU, using the NVIDIA Drivers link above.
Check which driver is installed by typing this into the terminal:
nvidia-smi.
Install CUDA. Note that cuDNN is supplied inside the anaconda environment files, so you don’t need to install it again.
Follow the steps above to get the
DEEPLABCUTconda file and install it!
Notes#
As of version 3.0+ the default engine is PyTorch. TensorFlow remains optional via
pip install "deeplabcut[tf]"and related extras; version ranges are defined inpyproject.toml(typically TensorFlow 2.12+ on supported Python versions). Upstream, native Windows GPU for TensorFlow stopped after 2.10. We advise Windows users to install WSL. We do not guarantee every future TensorFlow release for all platforms.Please be mindful different versions of TensorFlow require different CUDA versions.
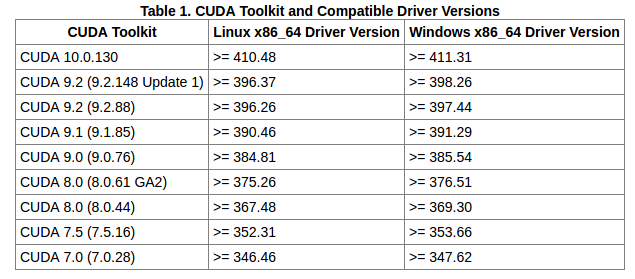
As the combination of TensorFlow and CUDA matters, we strongly encourage you to check your driver/cuDNN/CUDA/TensorFlow versions on this StackOverflow post.
To check your GPU is working, in the terminal, run:
nvcc -Vto check your installed version(s).The best practice is to then run the supplied
testscript_pytorch_single_animal.py(ortestscript_tensorflow_single_animal.pyfor the TensorFlow engine); this is inside the examples folder you acquired when you git cloned the repo. Here is more information/a short video on running the test scripts.You can test that your GPU is being properly used with these additional tips.
Ubuntu users might find this installation guide for a fresh DLC install on Ubuntu useful as well.
Troubleshooting#
TensorFlow#
Here are some additional resources users have found helpful (posted without endorsement):
FFMPEG#
A few Windows users report needing to install re-install ffmpeg (after windows updates) as described here: https://video.stackexchange.com/questions/20495/how-do-i-set-up-and-use-ffmpeg-in-windows (A potential error could occur when making new videos). On Ubuntu, the command is:
sudo apt install ffmpeg
DeepLabCut#
If you git clone or download this folder, and are inside of it then
import deeplabcutwill import the package from the local folder rather than from the latest on PyPi!
System-wide installation considerations#
Note
What is a system-wide installation?
A system-wide installation, or a base environment installation, is when you install using the default Python environment/interpreter on your computer, instead of a compartmentalized, separate environment (e.g., a conda environment).
This is often a source of conflicts between packages, user confusion and progressive “dependency hell” (where you have to keep installing and uninstalling packages to get the right versions for different applications).
To avoid this, we recommend using a virtual environment (e.g., conda or uv managed environments) to keep your DeepLabCut installation separate from other Python packages and applications on your system.
If you perform a system-wide/base environment installation, and the computer has other Python packages or TensorFlow versions installed that conflict, this will overwrite them.
If you have a dedicated machine for DeepLabCut, this may be temporarily fine, but will degrade over time as you try to install or update other packages.
Indeed, if there are other applications that require different versions of libraries, then installing/updating anything would potentially break those applications.
One way to manage virtual environments is to use conda environments (for which you need Anaconda/miniconda installed). An environment is a self-contained directory that contains a Python installation for a particular version of Python, plus additional packages, without any cross-talk with other environments (NVIDIA drivers being a notable exception, as they are system-wide by nature).
Hardware considerations#
Computer:
For reference, we use e.g. Dell workstations (79xx series) with Ubuntu 16.04 LTS, 18.04 LTS, 20.04 LTS, 22.04 LTS and for versions prior to 2.2, we run a Docker container that has TensorFlow, etc. installed (DeepLabCut/Docker4DeepLabCut2.0). Now we use the new Docker containers supplied on this repo (linux support only), also available through DockerHub or the
deeplabcut-dockerhelper script.
Computing Hardware:
An NVIDIA GPU with at least 8GB VRAM (memory) is ideal.
A GPU is not strictly necessary, but on a CPU the (training and evaluation) code is considerably slower (10x) for ResNets, but MobileNets are faster. You might also consider using cloud computing services like Google cloud/amazon web services or Google Colaboratory.
Camera Hardware:
The software is very robust to variations stemming from various cameras (cell phone cameras, grayscale, color; captured under infrared light, different manufacturers, etc.). See demos on our website.
Note that a model trained on certain data/camera may not generalize to data from a different camera however, so we recommend using the same camera for training and inference.
Software:
Operating System: Linux (Ubuntu), MacOS[1] (Mojave), or Windows 10. However, we the authors strongly recommend Ubuntu!
DeepLabCut is written in Python 3 (https://www.python.org/) and not compatible with Python 2.