The pose_cfg.yaml Guideline Handbook#
The following is specific to Tensorflow-based models. To read the equivalent explanations for Pytorch-based models, click here
👋 Hello! Mabuhay! Hola! This recipe was written by the 2023 DLC AI Residents!
When you train, evaluate, and run inference with a neural network there are hyperparatmeters you must consider. While DLC attempts to set the “globally good for everyone” parameters, you might want to change them. Therefore, in this recipe we will review the pose config parameters related to neural network models’ and the related data augmentation!
1. What is the pose_cfg.yml file?#
The
pose_cfg.yamlfile offers easy access to a range of training parameters that the user may want or have to adjust depending on the used dataset and task.You will find the file in the dlc-models > test and train sub-directories. There is also a button in the GUI to directly open this file.
This recipe is aimed at giving an average user an intuition on those hyperparameters and situations in which addressing them can be useful.
2. Quick start: full parameter list TOC#
2.1 Training Hyperparameters#
2.1.A max_input_size and min_input_size#
The default values are 1500 and 64, respectively.
💡Pro-tip:💡
change
max_input_sizewhen the resolution of the video is higher than 1500x1500 or whenscale_jitter_upwill possibly go over that valuechange
min_input_sizewhen the resolution of the video is smaller than 64x64 or whenscale_jitter_lowill possibly go below that value
2.1.B global_scale#
The default value is 0.8. It’s the most basic, first scaling that happens to all images in the training queue.
💡Pro-tip:💡
With images that are low resolution or lack detail, it may be beneficial to increase the
global_scaleto 1, to keep the original size and retain as much information as possible.
2.1.C batch_size#
The default for single animal projects is 1, and for maDLC projects it’s 8. It’s the number of frames used per training iteration.
In both cases, you can increase the batchsize up to the limit of your GPU memory and train for a lower number of iterations. The relationship between the number of iterations and batch_size is not linear, so batch_size: 8 doesn’t mean you can train for 8x less iterations, but like with every training, plateauing loss can be treated as an indicator of reaching optimal performance.
💡Pro-tip:💡
Having a higher
batch_sizecan be beneficial in terms of models’ generalization
Values mentioned above and the augmentation parameters are often intuitive, and knowing our own data, we are able to decide on what will and won’t be beneficial. Unfortunately, not all hyperparameters are this simple or intuitive. Two parameters that might require some tuning on challenging datasets are pafwidth and pos_dist_thresh.
2.1.D pos_dist_thresh#
The default value is 17. It’s the size of a window within which detections are considered positive training samples, meaning they tell the model that it’s going in the right direction.
2.1.E pafwidth#
The default value is 20. PAF stands for part affinity fields. It is a method of learning associations between pairs of bodyparts by preserving the location and orientation of the limb (the connection between two keypoints). This learned part affinity helps in proper animal assembly, making the model less prone to associating bodyparts of one individual with those of another. 1
2.2 Data augmentation parameters#
In the simplest form, we can think of data augmentation as something similar to imagination or dreaming. Humans imagine different scenarios based on experience, ultimately allowing us to better understand our world. 2, 3, 4
Similarly, we train our models to different types of “imagined” scenarios, which we limit to the foreseeable ones, so we ultimately get a robust model that can more likely handle new data and scenes.
Classes of data augmentations, characterized by their nature, are given by:
Geometric transformations#
Geometric transformations such as flipping, rotating, translating, cropping, scaling, and injecting noise, which are very good for positional biases present in the training data.
2.2.1 scale_jitter_lo and scale_jitter_up#
Scale jittering resizes an image within a given resize range. This allows the model to learn from different sizes of objects in the scene, therefore increasing its robustness to generalize, especially on newer scenes or object sizes.
The image below, retrieved from 3, illustrates the difference between two scale jittering methods.
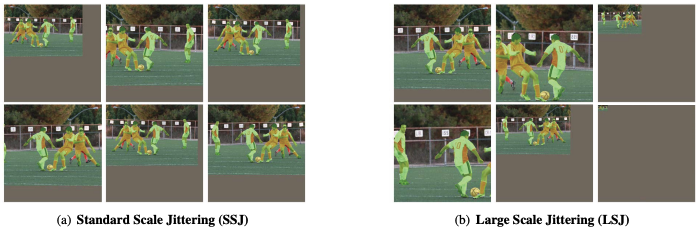
During training, each image is randomly scaled within the range [scale_jitter_lo, scale_jitter_up] to augment training data. The default values for these two parameters are:
scale_jitter_lo = 0.5scale_jitter_up = 1.25
💡Pro-tips:💡
⭐⭐⭐ If the target animal/s do not have an incredibly high variance in size throughout the video (e.g., jumping or moving towards the static camera), keeping the default values unchanged will give just enough variability in the data for the model to generalize better ✅
⭐⭐However, you may want to adjust these parameters if you want your model to:
handle new data with possibly larger (25% bigger than original) animal subjects ➡️ in this scenario, increase the value of scale_jitter_up
handle new data with possibly smaller (50% smaller than the original) animal subjects ➡️ in this scenario, decrease the value of scale_jitter_lo
generalize well in new set-ups/environments with minimal to no pre-training ⚠️ But as a consequence, training time will take longer.😔🕒
⭐If you have a fully static camera set-up and the sizes of the animals do not vary much, you may also try to shorten this range to reduce training time.😃🕒(⚠️ but, as a consequence, your model might only fit your data and not generalize well)
2.1.2 rotation#
Rotation augmentations are done by rotating the image right or left on an axis between \(1^{\circ}\) and \(359^{\circ}\). The safety of rotation augmentations is heavily determined by the rotation degree parameter. Slight rotations such as between \(+1^{\circ}\) and \(+20^{\circ}\) or \(-1^{\circ}\) to \(-20^{\circ}\) is generally an acceptable range. Keep in mind that as the rotation degree increases, the precision of the label placement can decrease
The image below, retrieved from 2, illustrates the difference between the different rotation degrees.
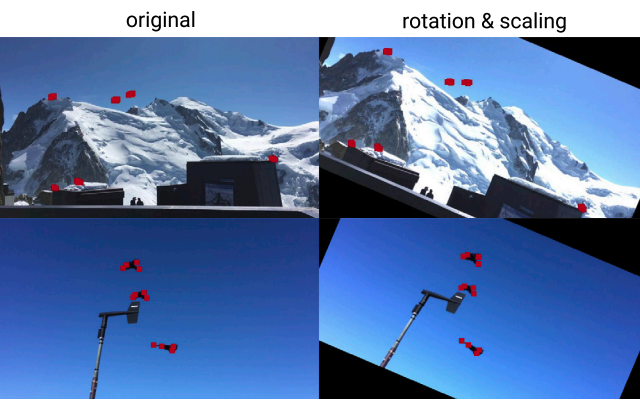
During training, each image is rotated \(+/-\) the rotation degree parameter set. By default, this parameter is set to 25, which means that the images are augmented with a \(+25^{\circ}\) rotation of itself and a \(-25^{\circ}\) degree rotation of itself. Should you want to opt out of this augmentation, set the rotation value to False.
💡Pro-tips:💡
⭐If you have labelled all the possible rotations of your animal/s, keeping the default value unchanged is enough ✅
However, you may want to adjust this parameter if you want your model to:
handle new data with new rotations of the animal subjects
handle the possibly unlabelled rotations of your minimally-labeled data
But as a consequence, the more you increase the rotation degree, the more the original keypoint labels may not be preserved
2.2.3 rotratio (rotation ratio)#
This parameter in the DLC module is given by the percentage of sampled data to be augmented from your training data. The default value is set to 0.4 or \(40\%\). This means that there is a \(40\%\) chance that images within the current batch will be rotated.
💡Pro-tip:💡
⭐ Generally, keeping the default value unchanged is enough ✅
2.2.4 fliplr (or a horizontal flip)#
Mirroring, otherwise called horizontal axis fipping, is much more common than flipping the vertical axis. This augmentation is one of the easiest to implement and has proven useful on datasets such as CIFAR-10 and ImageNet. However, on datasets involving text recognition, such as MNIST or SVHN, this is not a label-preserving transformation.
The image below is an illustration of this property (shown on the right-most column).
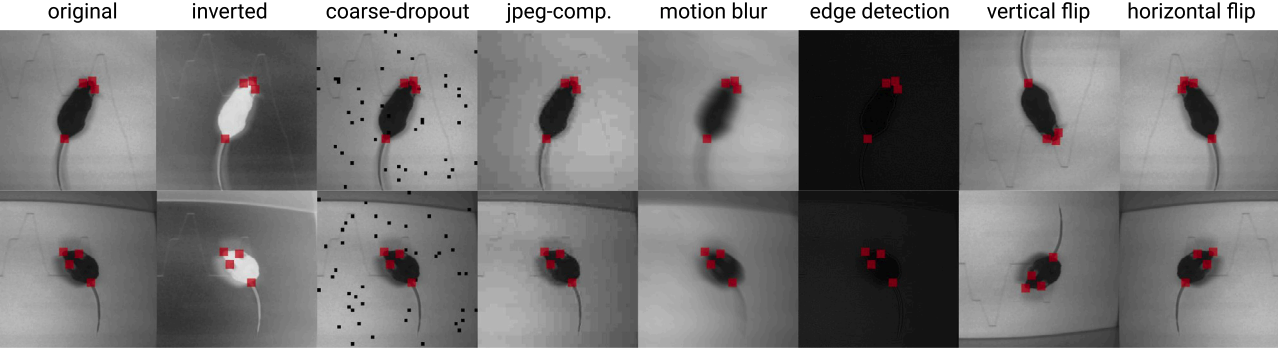
This parameter randomly flips an image horizontally to augment training data.
By default, this parameter is set to False especially on poses with mirror symmetric joints (for example, so the left hand and right hand are not swapped).
💡Pro-tip:💡
⭐ If you work with labels with symmetric joints, keep the default value unchanged - unless the dataset is biased (animal moves mostly in one direction, but sometimes in the opposite)✅
Keeping the default value to
Falsewill work well in most cases.
2.2.5 crop_size#
Cropping consists of removing unwanted pixels from the image, thus selecting a part of the image and discarding the rest, reducing the size of the input.
In DeepLabCut pose_config.yaml file, by default, crop_size is set to (400,400), width, and height, respectively. This means it will cut out parts of an image of this size.
💡Pro-tip:💡
If your images are very large, you could consider increasing the crop size. However, be aware that you’ll need a strong GPU, or you will hit memory errors!
If your images are very small, you could consider decreasing the crop size.
2.2.6 crop_ratio#
Also, the number of frames to be cropped is defined by the variable cropratio, which is set to 0.4 by default. That means that there is a \(40\%\) the images within the current batch will be cropped. By default, this value works well.
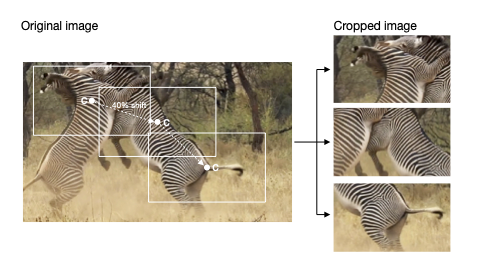
2.2.7 max_shift#
The crop shift between each cropped image is defined by max_shift variable, which explains the max relative shift to the position of the crop centre. By default is set to 0.4, which means it will be displaced 40% max from the center to not apply identical cropping each time the same image is encountered during training - this is especially important for density and hybrid cropping methods.
The image below is modified from 2.
2.2.8 crop_sampling#
Likewise, there are different cropping sampling methods (crop_sampling), we can use depending on how our image looks like.
💡Pro-tips💡
For highly crowded scenes,
hybridanddensityapproaches will work best.uniformwill take out random parts of the image, disregarding the annotations completely‘keypoint’ centers on a random keypoint and crops based on that location - might be best in preserving the whole animal (if reasonable
crop_sizeis used)
Kernel transformations#
Kernel filters are very popular in image processing to sharpen and blur images. Intuitively, blurring an image might increase the motion blur resistance during testing. Otherwise, sharpening for data enhancement could result in capturing more detail on objects of interest.
2.2.9 sharpening and sharpenratio#
In DeepLabCut pose_config.yaml file, by default, sharpening is set to False, but if we want to use this type of data augmentation, we can set it True and specify a value for sharpenratio, which by default is set to 0.3. Blurring is not defined in the pose_config.yaml, but if the user finds it convenient, it can be added to the data augmentation pipeline.
The image below is modified from 2.

2.2.10 edge#
Concerning sharpness, we have an additional parameter, edge enhancement, which enhances the edge contrast of an image to improve its apparent sharpness. Likewise, by default, this parameter is set False, but if you want to include it, you just need to set it True.
References#
- Cao, Z., Simon, T., Wei, S. E., & Sheikh, Y. (2017). Realtime multi-person 2d pose estimation using part affinity fields. In Proceedings of the IEEE conference on Computer Vision and Pattern Recognition (pp. 7291-7299).https://openaccess.thecvf.com/content_cvpr_2017/html/Cao_Realtime_Multi-Person_2D_CVPR_2017_paper.html
- Mathis, A., Schneider, S., Lauer, J., & Mathis, M. W. (2020). A Primer on Motion Capture with Deep Learning: Principles, Pitfalls, and Perspectives. In Neuron (Vol. 108, Issue 1, pp. 44-65). https://doi.org/10.1016/j.neuron.2020.09.017
- Ghiasi, G., Cui, Y., Srinivas, A., Qian, R., Lin, T.-Y., Cubuk, E. D., Le, Q. V., & Zoph, B. (2020). Simple Copy-Paste is a Strong Data Augmentation Method for Instance Segmentation (Version 2). arXiv. https://doi.org/10.48550/ARXIV.2012.07177
- Shorten, C., & Khoshgoftaar, T. M. (2019). A survey on Image Data Augmentation for Deep Learning. In Journal of Big Data (Vol. 6, Issue 1). https://doi.org/10.1186/s40537-019-0197-0