Multi-animal tracking#
The workflow for multi-animal projects is fully aligned with single animal projects. However, for multi-animal projects, the video analysis is slightly more complex: besides bare keypoint estimation, the keypoints need to be assigned to one of the different individuals and coherenty tracked across frames. This guide zooms in on the details of the tracking step in the video analysis for multi-animal projects. The full workflow is discussed in the user guide.
Important
From version 3.0 onward, deeplabcut.analyze_videos runs the full pose estimation + tracking pipeline by default (auto_track=True), producing an .h5 file ready for downstream use.
In prior versions of DeepLabCut, pose estimation and tracking were separate procedures. This behavior can still be obtained by setting auto_track=False. With auto_track=False, no .h5 file is produced — only a *_full.pickle file containing the raw detections. If auto_track=False, one must run convert_detections2tracklets and
stitch_tracklets manually (see below), granting more control over the last steps of
the workflow (ideal for advanced users).
Visualization before tracking#
Visualize raw keypoint detections (without tracking)#
To validate raw pose estimation performance on a video before committing to the tracking results, run:
videos_to_analyze = ['/fullpath/project/videos/testVideo.mp4']
deeplabcut.analyze_videos(
  config_path,
  videos_to_analyze,
  auto_track=False
)
deeplabcut.create_video_with_all_detections(
  config_path,
  videos_to_analyze
)
Visualizing part-affinity fields (PAFs)#
For models predicting part-affinity fields, another sanity check may be to
examine the distributions of edge affinity costs using deeplabcut.utils.plot_edge_affinity_distributions. Easily separable distributions
indicate that the model has learned strong links to group keypoints into distinct
individuals — likely a necessary feature for the assembly stage (note that the amount of
overlap will also depend on the amount of interactions between your animals in the
dataset). All TensorFlow multi-animal models use part-affinity fields and PyTorch models
consisting of just a backbone name (e.g. resnet_50, resnet_101) use part-affinity
fields. If you’re unsure whether your PyTorch model has a one, check
the pytorch_config.yaml for a DLCRNetHead.
Tip
If these results do not look good, we recommend extracting and labeling more frames (even from more videos). Try to label close interactions of animals for best performance. Once you label more, you can create a new training set and train.
You can either:
extract more frames manually from existing or new videos and label as when initially building the training data set, or
let DeepLabCut find frames where keypoints were poorly detected and automatically extract those for you. All you need is to run:
deeplabcut.find_outliers_in_raw_data(config_path, pickle_file, video_file)
where pickle_file is the _full.pickle one obtains after video analysis.
Flagged frames will be added to your collection of images in the corresponding labeled-data folders for you to label.
Manually run tracking steps#
Animal Assembly and Tracking across frames#
After pose estimation, now you perform assembly and tracking.
You can validate the tracking parameters. Namely, you can iteratively change the
parameters, run convert_detections2tracklets then load them in the GUI
(refine_tracklets) if you want to look at the performance. If you want to edit these,
you will need to open the inference_cfg.yaml file (or click button in GUI). The
options are:
# Tracking:
#p/m pixels in width and height for increasing bounding boxes.
boundingboxslack : 0
# Intersection over Union (IoU) threshold for linking two bounding boxes
iou_threshold: .2
# maximum duration of a lost tracklet before it's considered a "new animal" (in frames)
max_age: 100
# minimum number of consecutive frames before a detection is tracked
min_hits: 3
If the network was trained with identity supervision (i.e., identity=True in
config.yaml before training), this information can be leveraged during: (i) animal
assembly, where body parts are grouped by predicted identity rather than keypoint
affinity; and (ii) tracking, where identity alone can be used in place of motion
trackers to form tracklets.
To use this ID information, simply pass:
deeplabcut.convert_detections2tracklets(..., identity_only=True)
Note: If only one individual is to be assembled and tracked, assembly and tracking are skipped, and detections are treated as in single-animal projects; i.e., it is the keypoints with highest confidence that are kept and accumulated over frames to form a single, long tracklet. No action is required from users, this is done automatically.
Animal assembly and tracking quality can be assessed via deeplabcut.utils.make_labeled_video.create_video_from_pickled_tracks. This function provides an additional diagnostic tool before moving on to refining tracklets.
If animal assemblies do not look pretty, an alternative to the outlier search described above is to pass the
_assemblies.pickle to find_outliers_in_raw_data in place of the _full.pickle.
This will focus the outlier search on unusual assemblies (i.e., animal skeletons that were oddly reconstructed). This may be a bit more sensitive with crowded scenes or frames where animals interact closely.
Note though that at that stage it is likely preferable anyway to carry on with the remaining steps, and extract outliers
from the final h5 file as was customary in single animal projects.
**Next, tracklets are stitched to form complete tracks with:
deeplabcut.stitch_tracklets(
    config_path,
    ['videofile_path'],
    video_extensions='mp4',
    shuffle=1,
    trainingsetindex=0,
)
Note that the base signature of the function is identical to analyze_videos and convert_detections2tracklets.
If the number of tracks to reconstruct is different from the number of individuals
originally defined in the config.yaml, n_tracks (i.e., the number of animals you have in your video)
can be directly specified as follows:
deeplabcut.stitch_tracklets(..., n_tracks=n)
In such cases, file columns will default to dummy animal names (ind1, ind2, …, up to indn).
API Docs#
Click the button to see API Docs for analyze_videos
Click the button to see API Docs for convert_detections2tracklets
Click the button to see API Docs for stitch_tracklets
Using Unsupervised Identity Tracking:#
In Lauer et al. 2022 we introduced a new method to do unsupervised reID of animals. Here, you can use the tracklets to learn the identity of animals to enhance your tracking performance. To use the code:
deeplabcut.transformer_reID(config, videos_to_analyze, n_tracks=None, video_extensions="mp4")
Note you should pass the n_tracks (number of animals) you expect to see in the video.
Refine Tracklets:#
You can also optionally refine the tracklets. You can fix both “major” ID swaps, i.e. perhaps when animals cross, and you can micro-refine the individual body points. You will load the ...trackertype.pickle or .h5' file that was created above, and then you can launch a GUI to interactively refine the data. This also has several options, so please check out the docstring. Upon saving the refined tracks you get an .h5 file (akin to what you might be used to from standard DLC. You can also load (1) filter this to take care of small jitters, and (2) load this .h5 this to refine (again) in case you find another issue, etc!
deeplabcut.refine_tracklets(config_path, pickle_or_h5_file, videofile_path, max_gap=0, min_swap_len=2, min_tracklet_len=2, trail_len=50)
If you use the GUI (or otherwise), here are some settings to consider:
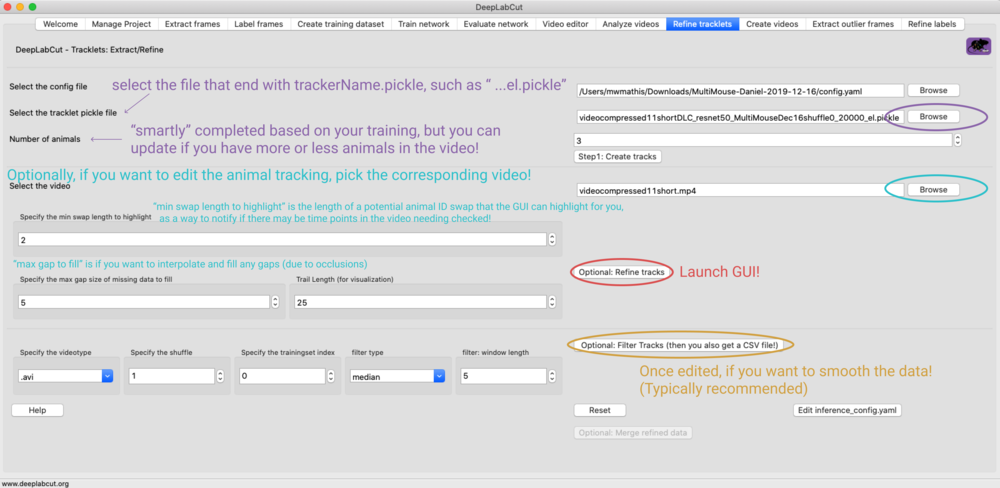
Fig. 11 Tracklet refinement GUI. Key settings to configure are described in the text.#
*note, setting max_gap=0 can be used to fill in all frames across the video; otherwise, 1-n is the # of frames you want to fill in, i.e. maybe you want to fill in short gaps of 5 frames, but 15 frames indicates another issue, etc. You can test this in the GUI very easy by editing the value and then re-launch pop-up GUI.
If you fill in gaps, they will be associated to an ultra low probability, 0.01, so you are aware this is not the networks best estimate, this is the human-override! Thus, if you create a video, you need to set your pcutoff to 0 if you want to see these filled in frames.
Short demo:

Fig. 12 Short demo of the tracklet refinement workflow.#